Music
Music can be added to clips by dragging and dropping audio files from the Music Collection to any clip on the Storyboard. You can also add music by selecting a clip on the Storyboard (by clicking on it) and then right-clicking on the audio file to be added and selecting Add to Storyboard. The music would be added to the clip you selected or the last clip you worked on i.e. the one with a dotted rectangle around it.
Rearranging clips on the storyboard does not remove or change the music added to them (unlike Narration ).
Adding Multiple Music Files to a Clip
You can add a maximum of 4 music files to a clip or the entire Storyboard. The same music file can be added more than once. To add more than one music file, select files by holding down the Ctrl key and clicking on the files one by one. Now right-click on any of them and select Add to Storyboard or drag the files to the Storyboard.
Music Options
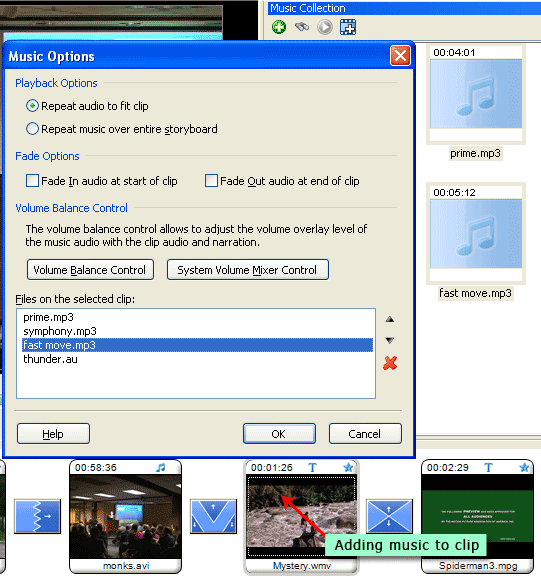
The Music Options dialog appears as soon as you try adding an audio file from the Music Collection.
 |
|
Figure 1: Adding Music to Clips |
In the figure given above, you can see that four clips are to be added. In the Playback Options, the first option is selected by default. If the duration of the music file (or files if there are more than one) is more than the clip you are adding music to, the option would be Trim Audio to fit clip. If the duration of the file (or files if there are more than one) is less than the duration of the selected clip, the option would be Repeat audio to fit clip (as shown above).
The other Playback option is Repeat audio over entire storyboard. When you select this option, the music file or files would be added to all clips on the Storyboard. If the duration of the files (or a single file) is less than that of the Storyboard, they would be repeated in the order in which they are arranged. You can use the up and down arrow buttons to change the order of music files. The red cancellation button can be used to remove a selected music file. If you remove the music added using this playback option from any one of the clips, it will get removed from all clips. Other remaining files would be ignored if the duration of previous file or files is more than the Storyboard.
Let's say the duration of your Storyboard is 5 minutes and you have added 3 music files: File A (2 minutes), File B (1 minute) and File C (3 minutes). When you select the 'Repeat audio over entire storyboard' option, the first two files will be played and the last file would be played for 2 minutes. The remaining one minute of the last file would not be played as its duration exceeds that of the Storyboard. If your Storyboard is of 3 minutes duration, and you have a single music file of 2 minutes duration, the file would be played once and then the first half played again to fill the remaining 1 minute.
The Volume Balance Control button allows you to change the volume of the clip audio, music and narration for the entire Storyboard. The System Volume Mixer Control button is for changing the operating system volume.
|