Understanding Volume Tracks
A volume track is used to vary volume of its corresponding Audio Track. The volume variations are measured in percentage of the originally authored volume and do not represent an absolute volume value.
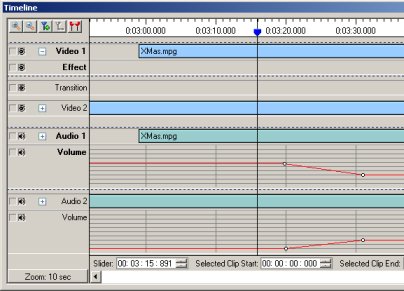 |
| Volume Tracks |
The figure above, shows both the volume tracks and their volume graphs that when played, will give an audio cross fade effect. The audio of Audio 1 will gradually fade out while the audio in Audio 2 will gradually fade in.
Read the article: Useful Audio Effects.
Components of the Volume Track
The volume tracks consist of many dark gray parallel lines running parallel across them and dark gray lines running vertically at every major tick of the scale forming a grid. This is called a Volume Grid.
Initially a red line runs across the length right in the middle of the volume track. This is the Volume Graph and shows no variations initially. In this figure, however, the volume graph shows variations. The volume graph in Audio 1 starts at normal (no variations - original volume) and then gradually decreases in the last few seconds. The volume graph in Audio 2 starts from the bottom (no volume) and then gradually increases in the first few seconds to its normal (no variations – original volume). This produces an audio cross fade effect.
The white dots that appear on the volume track are called Volume Points. These points are used to manipulate the volume graph. The volume graph runs from volume point to the next volume point. Volume points can be added and deleted as and when required. The volume graph is manipulated by dragging volume points with the mouse and changing their position. When a volume point is moved upwards, above the normal, volume increases and when a volume point is moved downwards, below the normal, volume decreases.
|