FTP Client: Configure Common FTP Tasks
Auto FTP Manager is a powerful tool that can be used to automate file transfers and synchronize folders. This article shows you some common situations so that you can save time while setting up the program. This product provides secure file transfer.
We'll set up Auto FTP Manager for the following tasks:
These are all jobs for an Auto FTP Manager Automated Transfer Profile. Automated Transfer Profiles let you perform intelligent transfers automatically.
Web Page Updates
Most web developers keep a copy of the entire web site on their own PC. That way, they can make changes and test the new pages before going "live" on the server. If you edit multiple files, you then have to upload all the changed files to the right folders on the server. Uploading every file would be slow and waste time and bandwidth. In this example, we will see the settings to upload only the changed files to the server, automatically.
First of all, here's the scenario. You are working on the site mysite.net. You keep a copy of all the files from that site on your hard disk, in the folder C:\Edit pages.
Click New Profile on the Tool bar and choose to create Automated Transfer Profile. You need to specify a folder location from your PC so that Auto FTP Manager knows where to upload files from. In our example the folder to be selected is the Edit pages from C:\.
The next step is to specify the FTP connection details. Specify the FTP address as mysite.net as given in the example. Enter the other connection details like the username, password, and port number. Once you have entered the details, click Test Connection. On successful connection, you can specify the FTP folder where you want the files to be transferred.
The Automated Transfer settings are critical. See Figure 1. You will always be editing the files on your own computer, then uploading the changed files. Therefore, you need to select "Transfer file from Usability: Documents to mysite.net". ( Usability is a demo name which will be replaced by your own computer name.)
Since you only need to upload the edited files from your PC to the server, enable only the option Transfer files from Usability: Documents to mysite.net.
Name the profile. Let's call it "Web Update". You can choose to immediately run your profile if desired by selecting Run the Automated Transfer Rules for this profile now. The computer will scan the server, compare modification dates and times with the files on your computer, and determine which ones need to be uploaded. Click Continue File Transfer and start transferring the modified files.
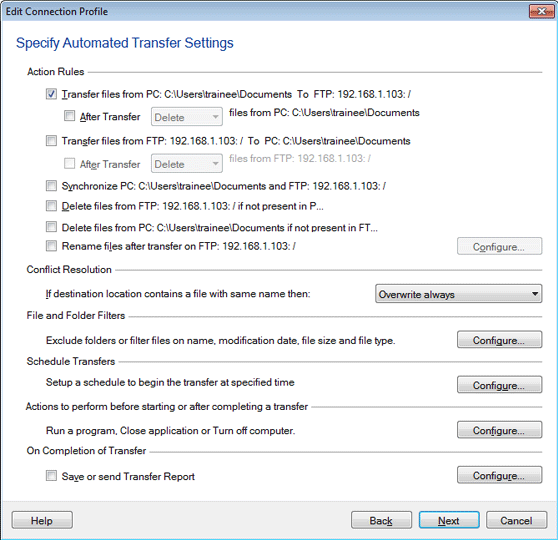
Figure 1
Now, whenever you finish a set of edits to the web site, you can just right-click on the "Web Update" profile and choose Start Transfer.
Daily Backup of Critical Files
There are certain files that you can't live without. Some information is too important to leave on only one computer that might crash, leading to the loss of data forever. You can use Auto FTP Manager to copy these files to a server on a regular basis, so the latest one will always be available even if your hard disk becomes an ex-storage device. For instance, if you're a writer, you probably want your unfinished (and finished!) work backed up. You could lose days, weeks, or months of work in a disk failure, if all your manuscripts are in the same place
The procedure to do the backups starts just like the steps above. Carry out all eight steps in the Web Page Updates procedure to create an Automated Transfer Profile. For the first folder, select the folder you store your work in on your hard disk (say, C:Work-In-Progress) and let the second folder be on a server of your choice.
Now, the one difference: we'll have this backup run automatically. Before clicking Finish, click on the Configure button for "Schedule". You can decide how often do you want the backups. For most files, I back up once per day. Pick a time when the computer will be turned on! If you don't have a fast Internet connection, you might want to schedule the backup to happen during your lunchtime or when you aren't around. See Figure 2 for an example setting.
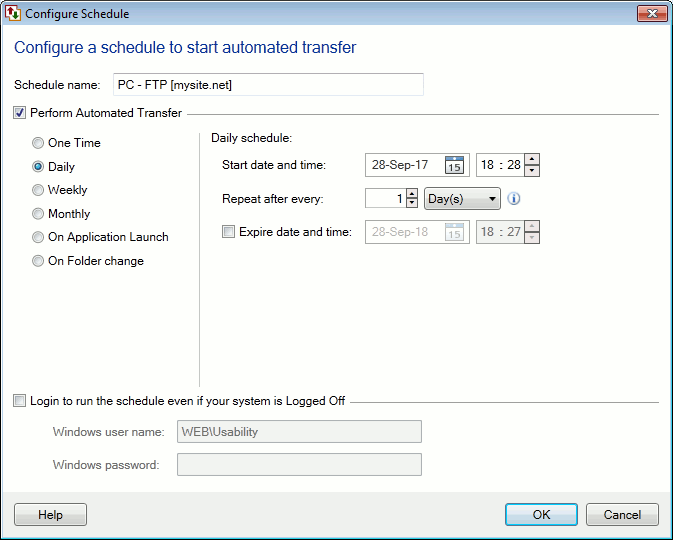
Figure 2
Receiving File Updates
Suppose you use a software package that gets frequent updates. The updates might be to one of the programs, to a help document, to a manual, or to a template file. With Auto FTP manager you can maintain a local copy of the whole package, on your own computer or on a networked drive, automatically. In fact, it's exactly like the procedure above for Daily Backup, with one change. That change is, you have Auto FTP Manager copy from the server to your local drive, not the other way.
See Figure 3 for an example configuration.
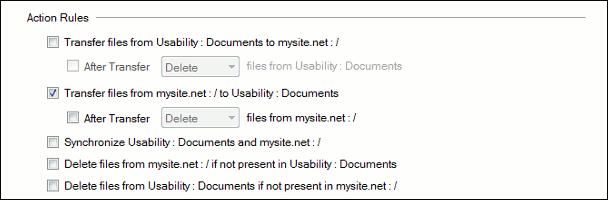
Figure 3
Keeping Two Systems Synchronized
Often, you will need to keep two systems synchronized. In Auto FTP Manager, that means that if you change either system, the other one is modified to match. One common reason to synchronize two systems: if two project team are simultaneously working at different locations and the changes made by both have to be uploaded to an FTP server. Team A as well as Team B have to upload the new files they have created to the server and also download the files created by the other team to their local folder.
The way this works is that files present only in the local folder (where Team A or Team B add/edit files) get transferred to the FTP server. Similarly, unique files present on the FTP server get transferred to the local folder. This results in both folders being identical. For files that are common (have the same name), conflict resolution has to be used.
As you have already figured out, you can synchronize the two systems by checking the "Synchronize" checkbox. If you check Synchronize, the other two transfer options are automatically checked.

Figure 4
By using the examples shown here as guides, you will be able to configure Auto FTP Manager to automate and schedule your the file-transfer tasks.