Avoid False Alarms with Masking
You set up a video surveillance system to protect your property. So far, so good! Now you’re getting dozens of alerts every day, because birds fly past a window. How can you prevent false alerts if a car drives past your door or the air conditioning moves the window curtains?
There is an effective remedy in Security Monitor Pro. Using the “Masking” feature, you can tell the program to ignore different parts of the camera view. Motion in the masked area is ignored. Motion detection alerts are triggered only if there is motion in the unmasked part of the video feed. Each camera can have its own individual mask, so you can block out the window seen by one camera and the bird cage seen by another.
Here’s an example: You are using security cameras to protect your business by monitoring key locations like file cabinets, the entrances to restricted access areas, vital equipment, the supply room, etc.
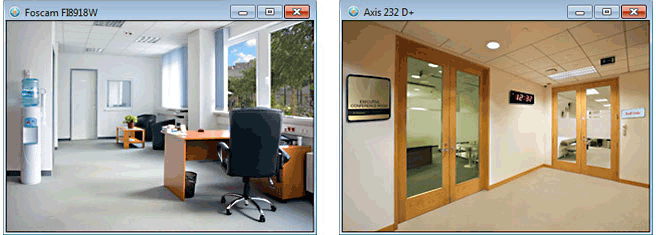
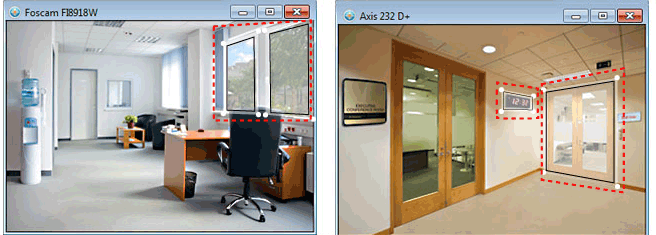
When you are away, you want to monitor your desk area. It’s fine if people enter your room, but you want to trigger an alarm if someone invades your personal space. The problem is that there are trees just outside your window that constantly move in the wind. Placing a mask over the trees solves the problem. The movements of tree limbs will not trigger an alert. Security Monitor Pro still detects motion everywhere else in the camera image.

The second camera monitors the conference room entrance. You want to know who uses it and participates in important client meetings. The digital clock should be masked because the moving display can trigger false alarms.
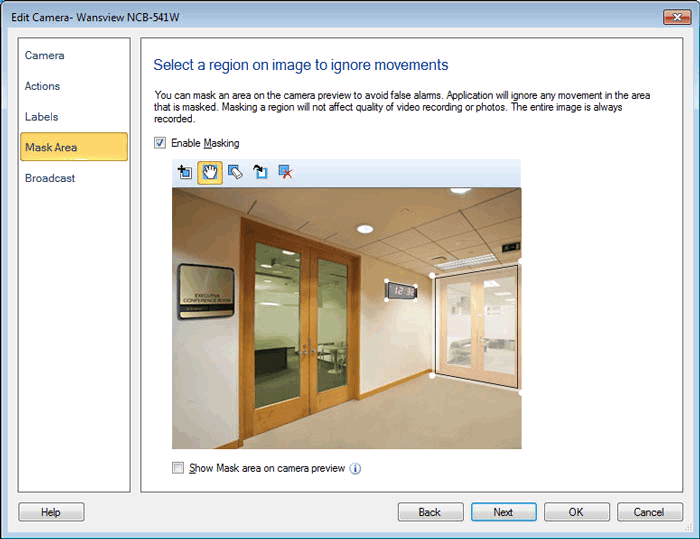
To define a mask area for your camera, click Camera >> Manage Cameras. Select the camera to Mask [in my case it is Foscam FI8918W] and click Edit Camera >> Mask Area.

Check “Enable Masking” then draw the mask area. Mask area toolbar will be enabled. This toolbar contains all the required commands, that will help you to draw Mask region.

- Mask Region: Clicking on the Mask Region Icon
 will add a default Mask at the center of the Preview area. To add another Mask, click on the Mask Region icon again.
- Grab and Move: To create a custom Mask Region, click on Grab and Move icon
 . Select a Mask. Move the mouse over the edges of a Mask region. The mouse cursor will change to a hand pointer, with a selection circle. Change the shape of the Mask by clicking on the circle and dragging.
- Eraser: To remove the Mask region, click on Mask eraser icon
 . You can also delete the selected Mask using the Delete key on your keyboard. When multiple Mask areas overlap, click the overlapped area with the Mask eraser the delete the top Mask.
- Invert Mask: Click on the "Invert Mask" icon
 to reverse the masking.
- Clear Mask: To remove all the Masks added, click Clear Mask icon
 .
.

Use the same method to mask the digital clock in the conference room. Mask settings do not change when you switch between camera views, close the program, or when scheduled monitoring starts or stops.
By masking your fireplace, curtains, flags, or aquarium fish, you can drastically reduce the number of false alarms in Security Monitor Pro. Masking will save storage space for recordings and photos, reduce e-mail traffic, and avoid wasting your time responding to an alert caused by a dog walking past your window. Focus your attention on real problems. Let masking create a more effective, more reliable surveillance system.