View your camera remotely
You want to be able to see what's happening on your property, even when you're not there. You can set up video surveillance system in any location. You will need a camera, your PC, Webcam Monitor and an Internet connection.
The remote monitoring features in WebCam Monitor offer several solutions. You can keep an eye on things from anywhere in the world. All you need to do is to connect your camera to your PC and start remote monitoring in WebCam Monitor, and you can always be aware of what is happening as it happens.
Using WebCam Monitor, you can remotely view your camera in three different ways.
-
You can watch a live broadcast from your webcam
-
View uploaded video recordings and photos on your web site
-
Receive email with embedded photos
Let us look at each of the three different ways to turn your PC and camera into a remote video surveillance system.
1. Live Broadcast:
In live broadcasting, WebCam Monitor sends a live stream of the video and/or audio from your camera over the Internet. If you have the Internet bandwidth, this is the best way to monitor the action live.
Preparing for broadcasting
First, you need a static IP address for the PC where the camera is connected. An Internet Protocol (IP) address is a unique number assigned to each computer in a network. A static IP address does not change. In contrast, a dynamic IP address can change frequently. A dynamic IP address may work temporarily for broadcasting, but when it changes the broadcast will no longer be available.
As an alternative to a static IP address, you can assign a domain name to your PC. Services like no-ip.com and dyndns.org will assign a name to your PC, which can then be used to view the broadcast video. For instance, a computer might be assigned the domain name jbshome.no-ip.com.
Broadcasting will not work from non routable IP addresses. Non-routable addresses cannot be used over the Internet. These addresses can only be connected to over a local network (LAN). All addresses starting with 192.168 are non-routable, as are some others. If you are not sure what type of IP address you have, you need to find out from your ISP or a network professional. If your PC has a non-routable address, you can still broadcast video by reconfiguring your network router to use "Port Forwarding", as explained in the article Configuring Your Camera and PC for Internet Broadcasting.
Configuring live broadcasting in WebCam Monitor
WebCam Monitor provides live broadcasting using Windows Media streaming technology. To prepare WebCam Monitor for live streaming:
-
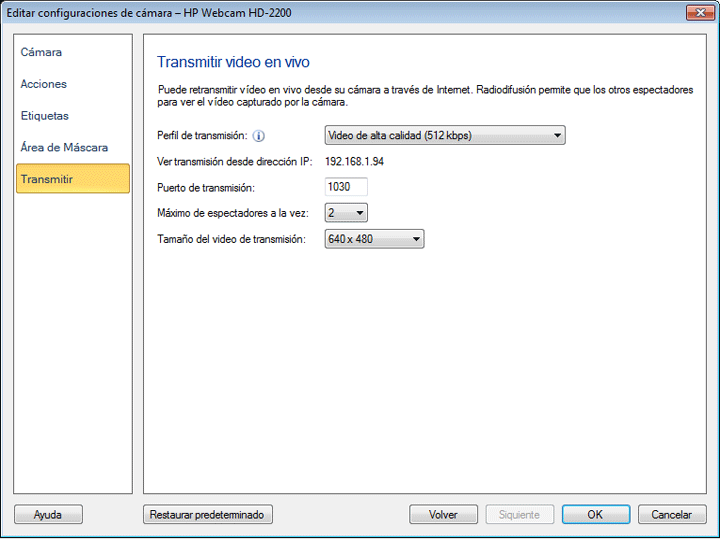
Right click on camera preview and select Edit Camera >> Broadcast. The Broadcasting Settings window opens.

-
Select a Profile based on the Internet connection speed available to your audience, and your own Internet connection "upstream".
-
All the IP addresses configured for your computer will be listed in the View broadcast from IP address drop down. If multiple IP addresses are configured on your PC, then select the IP address from which you want to Broadcast. Note: You can connect to this machine using any one of the IP addresses listed in this drop down.
-
WebCam Monitor will automatically fill in a port number. You can choose different ports if you prefer. Each camera must have a unique port number.
-
Specify the number of viewers that can connect simultaneously.
-
While Broadcasting, video size will be re-sized to the selected dimension from Broadcasting video size drop down.
-
Click OK.
To start broadcasting, click Actions >> Start Broadcasting. When you do, the program's Log will display the address and port number needed to view the live video.

As you can see, this computer has a name assigned. To find the computer's IP (numeric) address, click Tools >> View my Computer IP Address.
2. Watching live video from a remote location
All you need to view the live video broadcast is a media player and an Internet connection.
-
Open your web browser. Type the address shown in the WebCam Monitor Log, including the port number.
-
Press Enter. The media player will be launched and you will start receiving a live feed. There will be some delay for buffering.
To have your family and friends watch the live feed, just tell them the address and port number. As mentioned above, you may have to configure your Internet router to make your video broadcast available outside your local network.
Upload Video/ Audio and photos to an FTP Server:
With the Upload feature, WebCam Monitor can send video recordings and photos to an FTP server whenever motion is detected, or at regular intervals. Storing files on a server makes for easy storage, maintenance and analysis. Storing recordings and photos on a remote server also provides extra security, since the files are safe even if the computer running WebCam Monitor is stolen.
To upload recordings and photos to an FTP server:
-
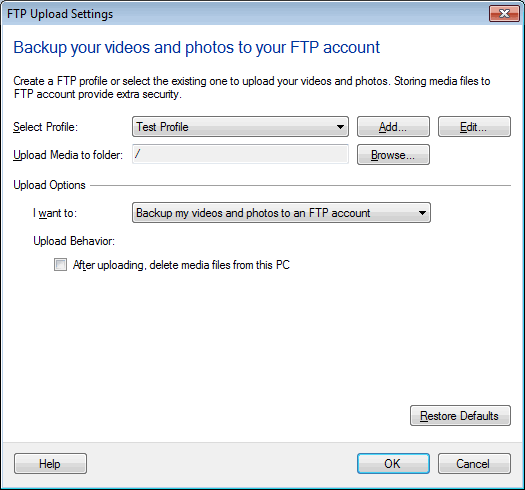
Right click on camera preview and select Edit Camera >> Actions. On the Actions tab, check Upload Media Files option and click the Configure button for Upload.

-
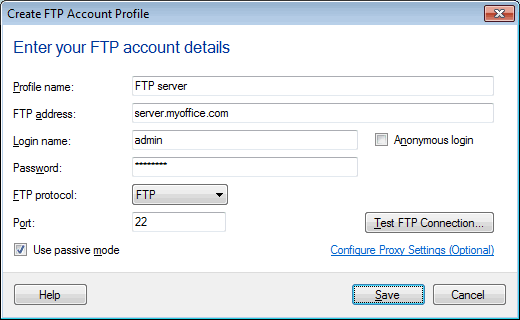
Click on Add button to create a new FTP profile. To Edit an FTP account settings, select the FTP Profile from the drop down. When you click on Add or Edit button, following dialog is shown:

-
Enter the name and login information for the FTP account and click on the Save button.
-
On FTP Settings dialog, select the type of files you want to upload from the I want to drop down.
-
If you select After uploading delete files from this PC then WebCam Monitor deletes the files from your local computer, once the file is uploaded. If Change the image size to option is checked then while uploading, the image file will be resized it to the selected dimension from the drop down.
-
Click OK, then OK again to close the Actions dialog.
Receive E-mail notification:
The E-mail Notification alert sends e-mail with a photo as an attachment, either when Motion is detected, or at regular intervals.
To configure email notification:
-
If you would like to receive email at regular intervals, right click on camera preview and select Edit Camera >> Actions. On the Actions tab, select At regular intervals of n minutes. If you would like to be sent email when motion is detected, then select When motion is detected.
-
Check E-mail Notifications. Click Configure to open the E-mail Notification Settings window.
-
Specify an e-mail address in the From field. This is the address the messages will be sent from. Specify the e-mail address of the recipient in the To field. You can list multiple addresses here, separated by commas. The E-mail Notification alert lets you send e-mails with an attached photo.
On Motion detection: If Include photos with Email is checked then WebCam Monitor will send 2 photos via e-mail, when motion is detected. If you don't want to include photos then uncheck this option. You can select N minutes from the drop down and set the interval between Emails. This will help you to limit the number of emails received.
At regular intervals: If you are monitoring at regular intervals, WebCam Monitor will always include 1 photo in the e-mail notification.
-
Click OK.
You can start monitoring by clicking Start Monitoring on the main screen.
Remote monitoring is an easy, convenient and effective way to stay informed at all times. Use Remote Monitoring in WebCam Monitor to keep an eye on your home or business anytime and from anywhere.