You can use most of the features of Site Translator from the Windows command line. This feature is helpful if you want to create scripts that translate files, schedule translation, or start the translation process from another program.
Command Line Syntax - Using the Command Line
" Site Translator " <path of File or Folder that is to be translated> - from <Original Language> - to <Language to Translate to> - out <Folder Path> [- subdir ] [- skip ] [- help ]
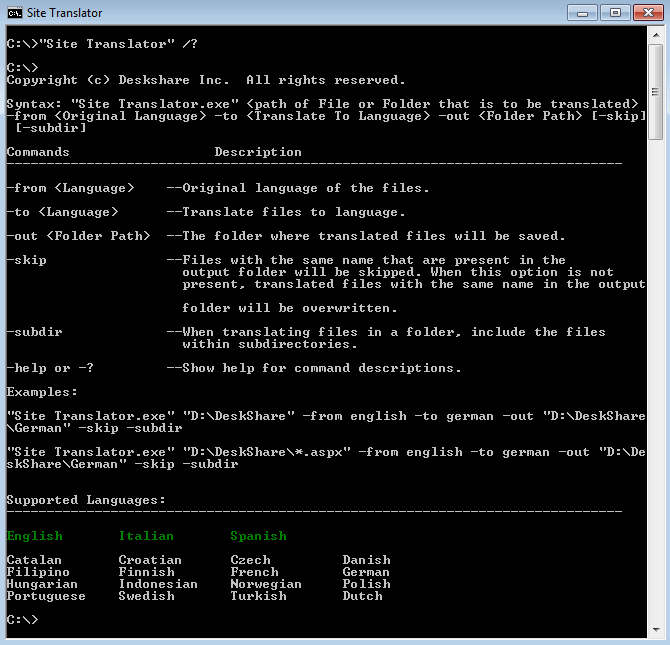
| Figure 1: Site Translator - Command Line Interface |
NOTE: All file names and directory paths must be enclosed in double-quotes if they contain one or more spaces. Using quotes can never cause a problem, so it is good practice to always enclose all file names and paths in quotes as shown in Figure 1.
Explanation of the Command Syntax:
<path of File or Folder that is to be translated>: You can translate either a single file, or every compatible file in a particular folder (See -subdir). You can also choose to translate only files of one particular type, see Translating Only One File Type. The first thing on the command line after Site Translator.exe must always be the file or folder to translate.
-from <language>: This is the original language of the file(s) being translated. If you do not know which languages are available, type Site Translator.exe - help. As shown above, this will display all available languages, with languages you are subscribed to in green and unsubscribed languages in white.
-to <language>: This is the language into which to translate. See above to determine which languages are supported.
-out <Folder Path>: Translated files or folders will be saved here. A new folder will be created (if necessary) at this location named after the abbreviation for the language you are translating into. For instance, if you translate into Spanish and specify '-out "C:\Translated Files"', the translated files will be stored in C:\Translated Files\es.
-subdir: If this parameter is given, Site Translator will translate all files in the specified directory and its subdirectories. If you do not specify -subdir, only files in the specified directory will be translated.
-skip: If Site Translator finds a file with the same name already in the destination folder during translation, and the -skip parameter was given, it will not translate the corresponding file and the existing file will be kept. If this parameter is not given, the existing file will be replaced by a newly-translated one.
-help or -?: Displays a usage message as shown above.
Translating Only One File Type
You can choose to translate only one file type when controlling Site Translator from the command line. Use standard Windows wildcards to control which file types are translated.
For example, to translate only the ASPX files in a folder, type:
C:\Program Files\DeskShare\ Site Translator \ Site Translator.exe D:\Deskshare\*.aspx - from <Original Language> - to <Language to Translate to> - out <Folder Path>
All the *.ASPX files will be translated. The other file types in the same folder will not be translated.
By using the command line interface, you can use Site Translator automatically on a schedule and easily control it from scripts and other programs. Use this powerful feature to automate your translation process.