|
|
Digital Media Converter 4.2
|
|
|
|
|
|
|
|
|
Reducing Video File Sizes |
|
|
|
|
|
|
|
|
|
Size does matter.
These three words
ring especially true
for video files.
Video files are
among the largest
files there are.
They fill up your
hard disk, slow down
your PC, get too big
to be copied other
computers, and can
be almost impossible
to distribute over
the Internet.
Though the Internet
bandwidth available
is always
increasing, and
storage options like
large hard drives
and DVDs become less
expensive every
year, a typical
video continues to
occupy 'too much
space'. |
|
|
|
|
|
|
|
Today, there
are a host of video
formats available.
This article
discusses two file
formats, and some
ways in which you
can significantly
reduce file sizes. |
|
|
|
|
|
| |
|
1. |
AVI
|
|
2. |
Windows
Media
Video
|
|
|
|
|
|
|
| |
AVI
| |
| |
| |
|
|
AVI
stands for Audio
Video Interleaved. This format has been
around for some
time. The AVI format
is very flexible
because you have a
choice of several
different
compressors to
balance file size
against quality. It's also very easy
to navigate and edit
using software like
Video Edit Magic. AVI
files are not a good
choice for
distribution
because file size is
simply too large,
even when
compressors are
used. |
|
|
|
|
|
|
|
You can get the
best possible
quality by using
an uncompressed AVI
file. However,
uncompressed AVI
files are
enormous, too
big to
practically
distribute or to
store. You need
to compress AVI
files, and
explore other
ways of reducing
the file size. You may lose
some quality
when trying to
reduce file
size. Some
ways to reduce
the size of AVI
files is:
|
|
|
|
|
|
|
|
|
1. |
Reduce the resolution. |
|
2. |
Reduce the frame rate. |
|
3. |
Increase the key frame rate |
|
4. |
Change the compressor. |
|
|
|
|
The article
Understanding
Compression
In AVI
has an
in-depth
description
of AVI
compression. |
|
|
|
Reducing
the
resolution
|
|
|
|
|
|
|
|
|
| |
|
|
|
You can reduce the
resolution of the
original AVI file to
significantly
decrease the file
size. Some AVI
files have very high
resolutions.
Resolutions that are
too high cannot be
displayed on a normal PC or
TV, so you lose no
effective quality by
reducing the
resolution. For example, you
might have AVI files
with a resolution of
1024 X 768 or even
higher. For
instance, 720 x 480
is the standard
resolution for DVDs.
Since normal
television sets work
at lower resolutions
than this, no
quality is lost for
TV applications, and
it also looks
good on a PC.
When you reduce a
file from 720 X 480
to 320 X 240, both
the height and width
are reduced by a
factor of 2, which
means that the total
amount of data
needed to store the
video is reduced by
a factor of 4. This
reduces the file
size significantly. (It does not reduce
the file size to 1/4
because most video
files also store
audio, and reducing
video resolution
does not change the
amount of storage
needed for the audio
portion.) |
|
| |
|
|
|
|
Reducing the Frame
Rate
|
|
|
|
Digital video is
actually a series of
images, which change
rapidly and give the
illusion of motion.
The frame rate is the
number of frames
displayed per second.
The frame rate has a
significant impact on
the file size. US
television has a frame
rate of 30 frames per
second (fps), while
films in theatres
are usually shown at 24
frames per second.
Lowering the frame rate
of your video to 15 or
10 fps can reduce the
file size by as much as
200% or 300%. However,
reducing the frame rate
may affect the
smoothness of the
playback.
Acceptable frame rates
vary depending on the
specific video clip.
You may have to
experiment to find the
lowest acceptable value. |
|
|
|
|
|
|
|
Increasing
the Key Frame Rate
|
|
|
|
In an AVI
file, the entire
image in the first
frame is stored
in the file. Later
frames are not saved
as complete images—only the
differences between
the frames are
saved. The key frame rate
defines how often
full frames ("key
frames") are
saved in AVI files. For example, if you
specify the key
frame rate as 50,
then after every 50
frames, a complete
frame is saved. A high
value of key frame
rate results in
smaller file size
because fewer full
frames are stored. However, the higher
the key frame rate,
the harder it is to
seek within a file. |
|
|
|
|
|
|
|
Changing the
compressor |
|
|
|
Uncompressed AVI
files are huge. AVI codecs
(COmpressor-DECompressor)
greatly reduce file
size while
maintaining optimum
quality. You can
choose from the
several codecs
available from
different sources. However,
you should keep in
mind
that your audience
must have the same
codec to uncompress
and view the file. Different compressors
deliver different
results. Cinepak
Codec, from Radius,
is a good choice
while distributing
to a wide audience,
since it has the widest
compatibility. (Cinepak is included
with all versions of
Microsoft Windows.) DivX or Xvid are good choices for high
compression and high
quality. You can also try
experimenting with other codecs. |
|
| |
|
|
| |
Changing Audio
Settings |
|
| |
The audio portion of
an AVI file can also
be compressed.
As with video
compression, audio
compression will
dramatically reduce
file size, by
sacrificing some
quality. In
practice,
high-quality audio
compression often
produces sound so
close to the
original that the
difference is hard
to detect.
Very commonly-used
audio codecs for AVI
files include MPEG
Layer 3 (MP3) and
CCITT -law.
For most codecs, you
can also select the
sample frequency.
This is the number
of times per second
(ranging from 8,000
to 48,000 times per
second) that the
encoder measures
sound levels.
In general, the
lower the number
here, the more
high-pitched sounds
will be lost in the
compression process,
but also the smaller
the final file size. |
|
| |
|
|
|
|
Reducing AVI file
size in Digital
Media Converter |
|
|
|
You can change the parameters discussed in the preceding section through
Digital Media Converter. This will help to significantly cut down on
file size while converting to AVI. To convert and
reduce file size
using Digital Media
Converter: |
|
|
|
|
|
|
|
|
1. |
Start Digital Media Converter. |
|
2. |
On the
File
menu, select
Add
Files. |
|
3. |
Select the AVI file you want to reconvert to a smaller AVI file. You can also
select files of other formats for conversion to AVI. |
|
4. |
On the
Tools
menu, select
Settings. |
|
5. |
Under the
General
Tab, select AVI
as the
Convert
to Format.
|
|
6. |
Select the
Properties
tab. You can change the parameters discussed in the preceding section from this
window. |
|
|
|
|
|
|
|
|
|
|
|
|
Now, you're ready to
convert and prepare
a small AVI
file. Select the
file for conversion and
click on the Convert
button on the toolbar. |
|
|
|
|
|
|
|
Windows Media Video |
|
| |
| |
|
|
Windows Media Video
provides good quality
with extremely small
file sizes. It is
fast becoming the most
popular choice video
email, web video, and permanent
storage on a PC.
When creating Windows
Media Video, you select
a pre-defined
profile that is
configured for a
specific distribution
method, for instance
"WMV For Desktop
Viewing, Very High
Quality Video, CD
Quality Audio."
The Profile handles all
the detailed settings
like choosing a codec,
frame rate, and so on.
Profiles are
pre-defined, and
are designed to create
extremely small
files. |
|
|
|
|
|
|
|
For example, to share a video over the Internet, you can select a WMV
profile designed to
create files for streaming from a streaming
media server like Video Desk. Similarly,
there are other profiles for
different
distribution needs
including profiles
for desktop viewing,
video hosted on a
(non-streaming) web
server, and
portable media
center devices.
Within each profile,
you can select from
a variety of
pre-configured
sub-profiles. If you're
aiming for the
smallest file size,
lower the bit rate
of the selected
profile, to lower
the final file size.
For a particular bit
rate, the higher the
resolution, the
sharper the picture. There is no
difference in the
file size for
different
resolutions if the
bit rate is the
same. |
|
| |
|
|
| |
To convert to Windows
Media Format using
Digital Media Converter: |
|
|
|
|
|
|
|
|
1. |
Start
Digital
Media
Converter. |
|
2. |
On the
File
menu,
select
Add
Files. |
|
3. |
Select
the file
you want
to
reconvert
to WMV. You can
also
select
an
existing WMV file
that you
want to
convert
to a
profile
that
gives
smaller
file
size. |
|
4. |
On the
Tools
menu,
select
Settings. |
|
5. |
From the
General
Settings,
select
an
appropriate WMV
profile
depending
upon
your
distribution
needs. |
|
6. |
Select
the
Properties
tab. |
|
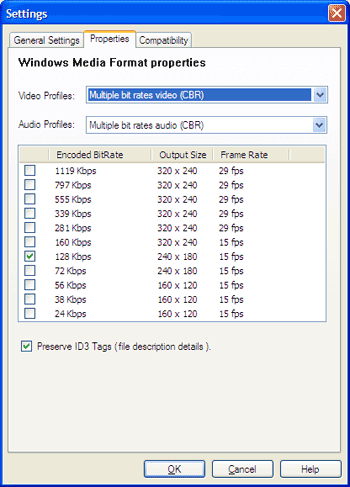
7. |
To
produce
the
smallest
possible
file, select
the
lowest
possible
bit rate
for your
choice
of Video
Profile. |
|
|
|
|
|
 |
|
|
|
|
|
|
|
|
|
|
|
|
Now, you're ready to
convert and prepare
a small-sized WMV
file. Select the
file for conversion
and click the
Convert button on
the Tool bar. |
|
|
|
|
|
|
|
A
final word
|
|
|
|
With so much content
available, it is a wise
choice to reduce file
size whenever possible. Follow these tips, get
the most out of your
file formats, store more
and then do more. When it comes to
file size,
think
small. |
|
|
|
|