Using Scene Detection in Auto Movie Creator
When you want to turn home video into a polished movie, one time-consuming step is: dividing it into scenes. With most software, you have to carefully position a slider or count off a number of frames, manually cut, then advance slowly through the video looking for the next spot to make a cut and carefully pick a new position.
Auto Movie Creator makes all that obsolete. With the built-in scene detection, you just tell the program to do all that for you. Leave the routine work to the program, while you concentrate on the creative part of the job. Just tell the program to detect scenes, wait for a little while, and you’re ready to edit your movie.
This article will explain the ideas behind scene detection, and walk you through the process using Auto Movie Creator. Reading this article may be the last time you have to think about the process of finding scenes in your video!
Before we can discuss the process, it’s important to know what some of the terminology means. Digital video is a series of still pictures, called frames. Each frame consists of many individual points of color, called picture elements or pixels. Rapid swapping of the frames, in succession, gives the illusion of motion. When filming, a shot is a video segment that’s recorded by a camera in one uninterrupted step. Switching from one shot to another is called a cut. When you start Auto Movie Creator’s Scene Detection, you’re asking the program to identify the cuts and split the video into clips at those points.
When a person manually edits a film, he or she looks for dramatic visual changes between frames to find cuts. The computer tries to do the same, but since it doesn’t actually understand what’s happening, it has to use mathematical analysis of each frame to compare them. For instance, if you see that frame 10,345 has a blue car in it, but 10,346 is showing a couch, you’ll immediately recognize that a cut happened there. The computer, instead, compares frames using several methods.
One simple method of scene detection is to compare each pixel in one frame with the matching pixel in the next one, and count how many are identical. A score is generated for this frame-to-frame change, based on how many pixels have changed. One problem with this method is that if the camera moves rapidly, all the pixels change (but there has been no actual cut). There are mathematical techniques to compensate for motion.
Using Scene Detection in Auto Movie Creator
Detecting scenes with Auto Movie Creator couldn’t be easier. The first step is to import your video file into the Video and Photos Collection, or capture some video from a digital camera.
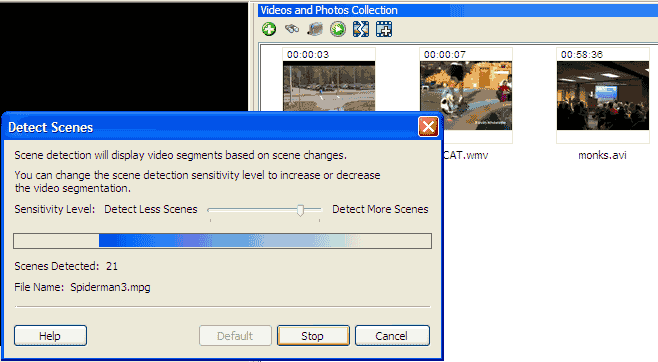
Right-click on the movie in the Collection and select Detect Scenes… The Detect Scenes window appears.
Here you can adjust the sensitivity of scene detection. Remember that the program assigns a score for each frame-to-frame change. The sensitivity is the minimum score that’s considered a cut. The farther to the right (Detect Less Scenes) you drag the slider, the higher the score, and the fewer scenes the video will be split into. Drag the slider to the left and Auto Movie Creator will consider lower scores a cut, and you’ll end up with the video divided into more clips. If you change your mind about adjusting the sensitivity, just click Default. When you’re ready to continue, click Detect.
Detection can take anywhere from seconds to minutes, depending on the length of the video, as well as the frame size (resolution) and other factors and, of course, how fast your computer is. While scene are being detected, a progress bar will be displayed, showing how far along the detection process is, and how many scenes have been detected so far. Generally it will take significantly less time to detect scenes than it would take to watch the video.
When detection is finished, the Video and Photos Collection window is divided. A new section appears at the bottom, showing the clips that the video has been divided into. You can now treat the clips exactly like video files in the Collection. For instance, you can right-click on them and add them to the Storyboard or Preview them.
If you click on a different movie or still in the Video and Photos Collection, the Scenes area will close. When you click on a movie that has had its scenes detected, the Scenes area will reopen and the scenes will be displayed. Scene information is stored in the Project file, so it will not be lost even if you close and reopen Auto Movie Creator (as long as you save your project).
If you decide that you would like to detect either more or fewer scenes, you can simply right-click on the video file again and restart Scene Detection, using a different level of Sensitivity.
Auto Movie Creator’s Scene Detection makes movie-making more about your creativity, and less of a boring chore. It’s one of the ways we’re making video editing just as much fun as it always should have been.