Understanding the Timeline
The first step towards producing good compositions is to understand the Timeline. The Timeline has been discussed briefly previously in this document. Now the Timeline must be understood with an editing perspective.
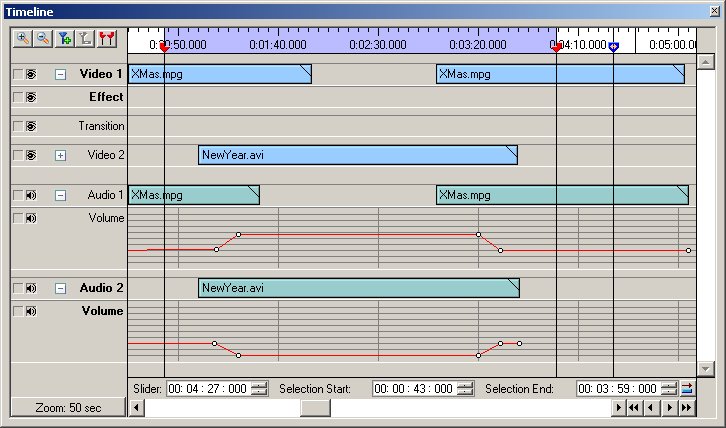 |
| Complete View of the Timeline |
This figure shows a portion of the Timeline resized to accommodate the entire contents of the Timeline. None of the components of this Timeline are hidden so that they can be clearly identified and understood.
First Glance
Of the many components that make up the Timeline of Video Edit Magic, the most prominent are tracks. These are the multiple horizontal bars that run across cross the Timeline. There are in all nine tracks in Video Edit Magic. If the tracks are to be categorized as groups then the tracks can be identified as:
- Two video tracks labeled Video 1 and Video 2 respectively.
- Two effect tracks labeled Effect. One is associated with Video 1 and the other with Video 2.
- A single transition Track, labeled Transition, between the two video tracks – Video 1 and Video 2.
- Two audio tracks labeled Audio 1 and Audio 2 respectively.
- Two volume tracks labeled Volume. One is associated with Audio 1 and the other with Audio 2.
Track Selections
One track out of the two video tracks can be selected and one track out of the two audio tracks can be selected. A selection is displayed as a thin line around the video and the audio track. Video and audio tracks can be individually selected. In the figure, Video 1 and Audio 1 tracks are selected (labels appear in bold). The Transition track cannot be selected. The Effect Track and the Volume Track can be selected only along with its corresponding Video or Audio track.
When the selection sliders are visible then a Range of Timeline is selected. The range of a track that is selected appears with a dotted rectangle spanning the selection sliders. The Lock and Disable option can result in a track not being selected.
When the selection sliders are not visible then the sources in all tracks can be selected by clicking on them. A dotted line appears around the selected source or sources. Multiple sources can be selected by pressing the Ctrl key and then clicking a source.
Hiding/Showing Tracks
The Effects and Volume tracks can be hidden or shown as desired. To hide/show effects track click the white square with a plus/minus sign besides video track labels. The volume tracks can also be hidden or shown in a similar fashion. When Video Edit Magic is opened, the Effect Track associated with Video 2 and both the volume tracks are not shown.
The Scale
A scale, right at the top of the Timeline represents time. Time is expressed in the format “H:MM:SS.LLL”. The first digit expresses hours (H), the next two minutes (MM), the next two seconds (SS) and the last three, after a decimal point, milliseconds (LLL) (1000 millisecond equals 1 second). All the tracks below this scale plot their contents as per the scale. The scale can be zoomed in and out by clicking the Zoom In and Zoom Out button from the Timeline controls at the top left corner of the Timeline (first two buttons). Zooming In and Out the Scale essentially means zooming in and out the Timeline as the tracks use the scale to plot (display) their contents. The Timeline can also be zoomed by going to Tools > Zoom In Timeline Scale and Tools > Zoom Out Timeline Scale or using the shortcut keys F6 and F7 respectively.
Function of different types of tracks
A track represents a stream of (either picture or sound), an effect, a transition or a volume variation depending on its type. When a media file that contains both audio and video is added to the Timeline, the video stream of that file is added to the selected video track and the audio file is added to the selected audio track. The duration of the clip is represented on the track and plotted against the scale. In Figure 1, two separate media files – NewYear.wmv and XMas.mpeg are shown added to the Timeline.
Streams, effects or transitions added to the Timeline are collectively referred to as sources. The sources on the Timeline are labeled by the file names, effect names or transition names. For instance the video stream of the file NewYear.wmv is displayed in Video 1 and the audio stream of the same file is displayed in Audio 1. The Effect and Transition tracks are similar to Video and Audio tracks except that they display effects and transitions (sources) respectively rather than video and audio streams. Each source can be can be selected by clicking on it. The volume tracks are unlike any other tracks. They display volume variation.
Learn about Using Volume Tracks…
Sliders
The Timeline also has three sliders running vertically across the height of the Timeline. Each slider has a handle (in the scale) that is used to reposition them anywhere in the Timeline. The Seek Slider is always present and visible on the Timeline while the Selection Sliders can be activated whenever a selection has to made on the Timeline. The slider with the blue handle is the Seek Slider and the sliders with the red handles are the Selection Sliders.
The seek slider is used to preview the Timeline. The sources that lie at the position (time) of the slider is displayed in the preview window. The seek slider is also used while editing. To move the seek slider, drag its handle along the Timeline. For better editing, you can also select the slider by clicking its handle and then tapping the Left and Right arrow keys to move the slider. To nudge the slider one millisecond at a time, hold down the Shift key while using the Left and Right arrow keys. When you select the seek slider or click anywhere on the scale, a small double-headed arrow appears on the Seek Slider's handle.
The Selection Sliders, a start selection slider and an end selection slider, are not always visible.
Learn about Using Selection Sliders...
Markers
Markers are cueing tools that are used to mark a particular position in the Timeline. Markers can be added and removed to the Timeline as desired by using the Add/Remove Markers in the Timeline controls at the top left corner of the Timeline (the third and fourth buttons).
Learn about Using Markers…
|