|
Configuring the Proxy Server
Security Monitor Pro requires an Internet connection for uploading media files. If you connect to the Internet via a proxy server then you must configure it in Security Monitor Pro to upload media files.
To configure the proxy server, click FTP Upload >> Configure upload settings >> Add / Edit >> Configure Proxy Settings.
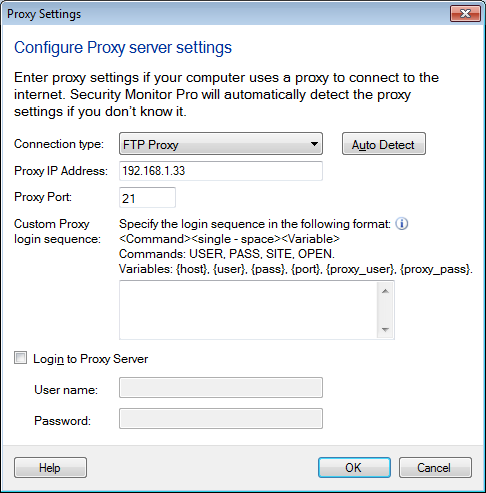
Proxy Settings
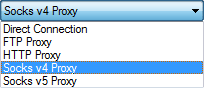
- Connection type: Connection type defines how to connect to the FTP server. By default, Direct Connection is selected. This will directly connect to an FTP Server without connecting through a proxy. Following connection types are supported:
If you do not know the proxy details, you can click on the Auto Detect option. This option detects the Proxy settings configured in Internet explorer and displays them in the respective fields. If that does not work, then you may need to contact your Network Administrator for assistance.
- Proxy IP Address: Enter the Host Name (Example: ftp.myserver.com) or IP Address of the Proxy Server.
- Proxy Port: Enter the proxy port number. This field is automatically set to the default value, depending on the selected Connection type.
- FTP: 21
- HTTP: 80
- Socks v4/5: 1080
- Custom Proxy login sequence: If selected Connection type = FTP then this field is visible. This login sequence instructs the proxy, how to connect to FTP server. Specify the login sequence in format: <Command><Single - space><Variable>.
- Commands: USER, PASS, SITE, OPEN. To separate commands, enter them on a new line.
- Variables: {host}, {user}, {pass}, {port}, {proxy_user}, {proxy_pass}
- {host} - Sends the address of the remote FTP Server.
- {user} - Sends the user name configured for the FTP Server.
- {pass} - Sends the password entered in Create Connection Wizard.
- {port} - Sends the port number you typed in the Create Connection Wizard.
- {proxy_pass} - Sends the password entered in the Proxy server tab as authentication for the firewall.
- {proxy_user} - Sends the user name entered in the Proxy server tab as authentication for the firewall.
Examples of few login sequences:
|
Example 1 |
Example 2 |
Example 3 |
SITE {host}
USER {user}
PASS {pass} |
USER {proxy_user}
PASS {proxy_pass}
SITE {host}
USER {user} |
OPEN {host}
USER {user}
PASS {pass} |
- Login to Proxy: In some cases, you may also need to check the Login to Proxy option and specify the User name and Password to connect to the server.
|