Cut Lengthy Screen Recordings to Manageable Segments
You're creating an ultra cool demo for your web site. Your screen recording is perfect... or that's what you thought until your boss wanted you to remove the discussion of one whole feature, and add in a section on the new site map. With My Screen Recorder Pro you can easily remove the unwanted section and replace it with a new one, without having to recreate the entire recording. This article will show you how, using the cut and join features.
As you probably figured out, cut lets you break a recording into pieces, and join lets you combine two or more recordings (or two of the pieces you make with cut) into a single movie. I'll walk through removing an unwanted piece from the demo and replacing it with new material, then combining them to make the finished demo.
I'll start with the splitting process.
This feature is helpful if you have a media file with a long duration and you are only interested in a part of it. For instance, you may want a particular video or an audio portion from a long recording. You may also wish to divide the files into smaller parts, either by duration or file size. With the split tool the output file can be created in WMV, AVI, MPEG4 or WebM formats.
To Cut Screen Recordings:
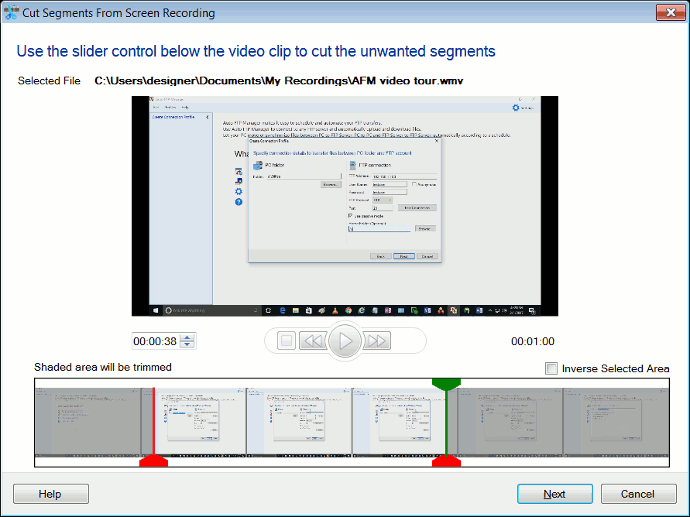
Click on Tools >> Cut File. You can also select the file from the Files List and right click and select Cut File... to add the file for splitting.
The cut file window is as displayed:
Selecting Output Format and Profile
Select the output file format in which you want to create the splits from the Video Format drop down list. Select a profile that suits your need. When you select a profile from the Video Profile list the details of the selected profile are displayed in the Details section.
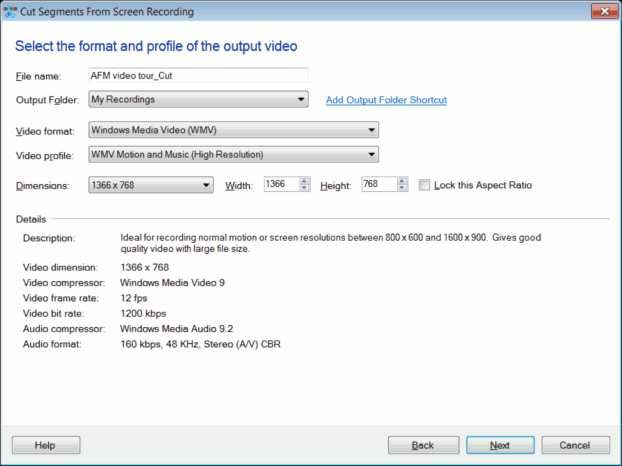
Select the dimensions of the output splits from the Dimensions drop down list or you can specify any custom dimensions using the Width and the Height controls. If the Lock this aspect ratio box is checked the horizontal and vertical sizes will be maintained proportionately when you change the width or height. Click Next.
Specifying Output Format
Select a folder where you want the resulting splits to be saved from the Folder dropdown list. You can choose to save the segments of screen recordings at a different location using the New Add Output Folder Shortcut link.
Click Next to start creating the splits. Click Finish after the process is complete.
To know about, how to join your screen recordings in My Screen Recorder Pro, please refer to our next articles Splicing Screen Recordings.