| Digital Media Converter Pro: CD and DVD Ripping |
CD and DVD Ripping
Digital Media Converter Pro can convert the audio and video from a DVD or the sound recorded on audio CDs and convert them to digital files.
To rip either a CD or DVD, click the Rip CD/DVD button in the program's toolbar.

The Rip Audio CDs and Video DVDs window appears.
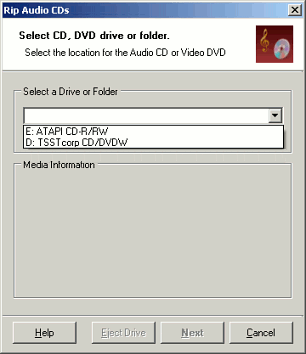
Select the drive that contains the disc you wish to rip, and click Next. Depending on which type of disc is in the drive, Digital Media Converter Pro will begin either the CD or DVD ripping process.
DVD Ripping
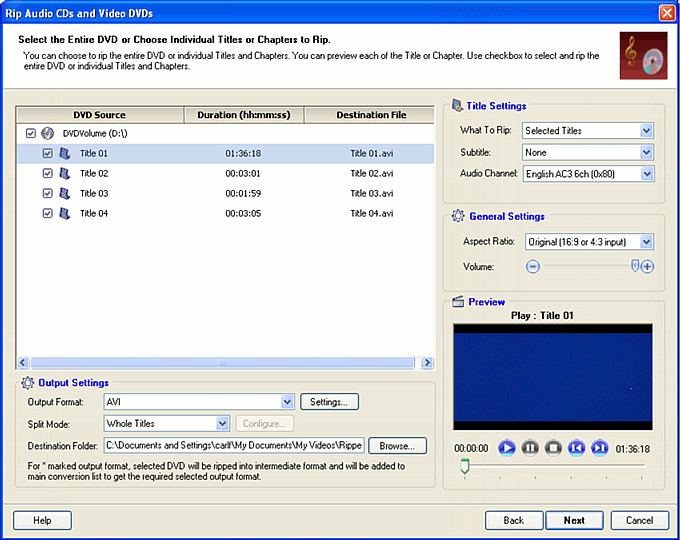
If you are ripping a DVD, the window above is displayed. Here you can choose what titles and chapters from the DVD to rip, and what file format to save the ripped audio and/or video into. Chapter Selection
The titles and chapters are displayed in a list. You can choose to rip each by selecting the checkboxes next to them. If you do not wish to rip the entire DVD, be sure that you choose Selected Titles in the Title Settings. Title Settings
There are three Title Settings
- Rip: Choose whether to rip the Whole DVD, Selected Titles, or Selected Chapters.
- Subtitle: Digital Media Converter Pro can display a selected subtitle track in converted video. Choose the subtitle track you want displayed, or None, from the dropdown list.
- Audio Channel: Some DVDs have multiple sound tracks, containing different languages or a director's commentary. You can select whichever audio track you prefer from this list.
General Settings
- Zoom: You can use this setting to control how Digital Media Converter Pro handles converting widescreen (16:9 aspect ratio) video into standard 4:3 format.
- LetterBox: If you select this option, the full widescreen video will be "squeezed" into the middle of a 4:3 movie, with black stripes above and below it.
- PanScan: If you select Pan Scan, only the middle of the original widescreen video will be ripped. The right and left edges will be left out of the new video files.
- b>Medium: If you select Medium, some video will be lost at the right and left sides, and there will be black stripes at the top and bottom. However, less material will be lost at the sides and the top and bottom stripes will be smaller than in the first two options.
Read the article, Video Dimension, Aspect Ratio and DVD. Preview
The Preview permits you to see the contents of each Title and Chapter, to help you select which to rip. Select a Title or Chapter, then click the Play button. The Stop and Pause buttons let you control playback, and the Previous and Next buttons let you jump from one Title or Chapter to another.
In order to preview DVD video, you may be prompted to install a free MPEG 2 decoder. No downloading is required. Simply click on click here to begin the installation process. Output Settings
Select an Output Format from the list.
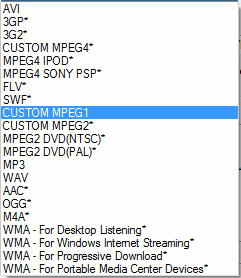
Digital Media Converter Pro always initially saves the ripped video as AVI, Custom MPEG 1, MP3, or WAV format. If you select a different file format, after the ripping process is complete Digital Media Converter Pro will add the ripped files to the conversion list and convert them into the proper format. For instance, if you choose to create 3G2 files to view on a mobile phone, the video will be ripped to AVI, then converted to 3G2 format.
If you choose to rip as AVI, Custom MPEG 1, MP3, or WAV, you can click Settings to change the properties of the new media files. You can find information about the file formats available here:
If you select MP3 or WAV, only the sound from the DVD will be ripped.
If you select another format, you will choose settings for it before conversion begins. See Converting Media Files for information about the other formats' settings.
Use Split Mode if you would like to have the ripped files limited to a certain size. If you select Custom Size and Configure the size to 600 megabytes, whenever a ripped file reaches that size, Digital Media Converter Pro will save that file and start ripping another. This can be helpful if you want files to fit onto certain physical media, for instance CD-ROMs or Zip disks.
You can select the Destination Folder to save the ripped files to. Be sure to pick one with enough free space for the audio/video you are ripping.
When you are finished choosing Titles/Chapters and have selected the correct settings, click Next.
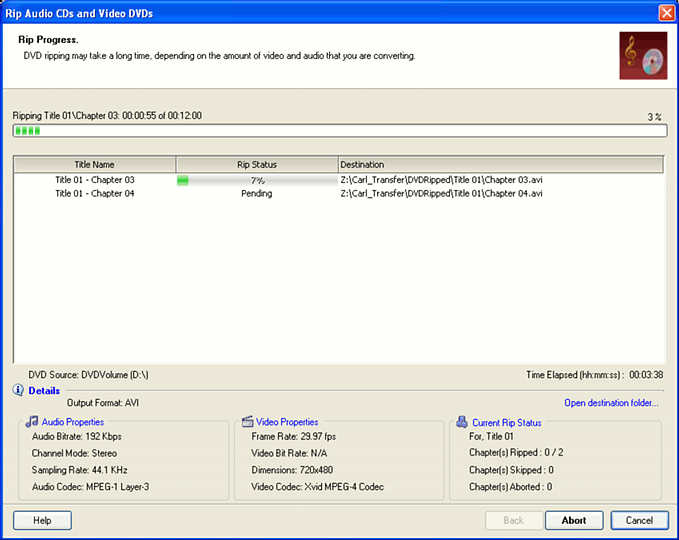
The Rip Progress window shows you the current status of the ripping: what chapter or title is being ripped, how far long the process is, the and properties of the file being created.
When the process is complete, click Open destination folder to open that folder in the Windows Explorer, allowing you to view or listen to the new files and confirm that the ripping was performed correctly.
CD Ripping
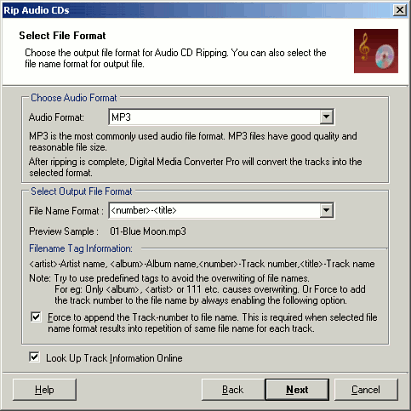
If a CD is in the selected drive, the Select File Format window appears. Choose the Audio Format that suits your needs.
Use File Name Format to choose how Digital Media Converter Pro names the audio files it creates. The default setting is fine for most purposes—most personal audio players list songs by their title, not their filename, in any case. If you choose a filename pattern that will produce the same title for several songs (for instance "<artist>"), be sure to select Force to append the Track-number so that each gets a unique name. If you do not do this, as each track is ripped it will replace the previously-ripped track, and you will end up with only the last track.
If you select Look Up Track Information Online, Digital Media Converter will contact a database over the Internet and find information like album title, song title, and artist name for each audio track. Uncheck this if you do not have an Internet connection to save time.
The next screen of the Wizard lets you choose tracks and a folder to save into:

By default, all the tracks are selected. You can control which tracks are ripped by selecting or deselecting the checkboxes. To hear a track, use the CD Preview. The four buttons are Previous track, Play/Pause, Stop, and Next track. Select a track, and use the Play button to listen to it. This will help you decide which tracks to rip, especially for CDs not found in the CDDB, in which case the tracks are only labelled "Track 1", "Track 2", and so on.
If digital CD playback has been disabled, this message appears:

Digital Media Converter automatically re-enables digital playback, but you will need to restart the computer for the change to take effect and Digital Media Converter Pro to preview tracks from audio CDs.
Rip Settings tab.

If there are defective areas on a CD they can introduce noise, called jitter, into the audio stream. Jitter Correction mathematically analyzes the sound data as it is read, and corrects for these problems. It increases the fidelity of the sound reproduction, but also slows down the ripping process. Most CDs do not jitter, so the default is to use Jitter Correction only if errors are detected. If you hear clicks during playback of your ripped files, you may wish to set Jitter Correction to Always for maximum correction.
The CD Drive area lets you control the behavior of the CD drive. You can Lock CD when ripping, to prevent the drive from opening during the process, and/or Eject CD when ripping is done, which can both alert you that the process is complete and make it easier to change CDs if you are ripping several in one session.
To "normalize" audio means to reduce differences in volume. If the tracks you are ripping have very different volume levels, it may be hard to listen to them together without adjusting the playback volume. Choosing to Normalize the output audio tracks can solve this problem.

Most people will not need to change anything on the CDDB tab. Change these settings only if you are having trouble communicating with the CDDB. Experts may wish to use a different online CD database, in which case you would change the CDDB Server and CGI Script settings. The details will be explained in the documentation for the alternative database. Ask your network administrator for assistance in setting up a network Proxy.
Clicking Next opens the Ripping Tracks screen. Digital Media Converter Pro displays its progress as it reads tracks from the CD and converts them to WAV files. You can stop the process by pressing the Stop button. When the process completes, press Finish.
Note that if you have not checked Look Up Track Information Online, the files will be named "01 Track 1", "02 Track 2", and so on.
After tracks are ripped, a link appears that lets you Create M3U Playlist of ripped files. Playlists are small files that tell audio players which files to play in which order. If you would like to create a playlist, click the link. You can edit the playlist using the Playlist Editor.
The CD tracks are originally ripped as WAV files. After ripping is complete, the WAV files are added to the conversion list, and you can convert them to the desired final format. The WAV files also remain on your hard disk. If space is an issue, you may want to delete them after confirming that your conversion was successful.
|