Applying Effects
Convert your videos and improve the quality in a single step. A wide range of color balance and transform effects are provided that you can apply to your media files before conversion.
The effects are applied to all the files that you convert in a single session. This way you will not have to specify the effects for every single file. If you do not want to apply effects to all the files, uncheck them in the File List and convert them separately.
The audio effects include adjusting the volume level of your media file. The audio volume can be increased up to 400% for the output file.
All the effects that you apply to your media files can be previewed before conversion in the built-in player.
Click on Tools >> Video Effects.
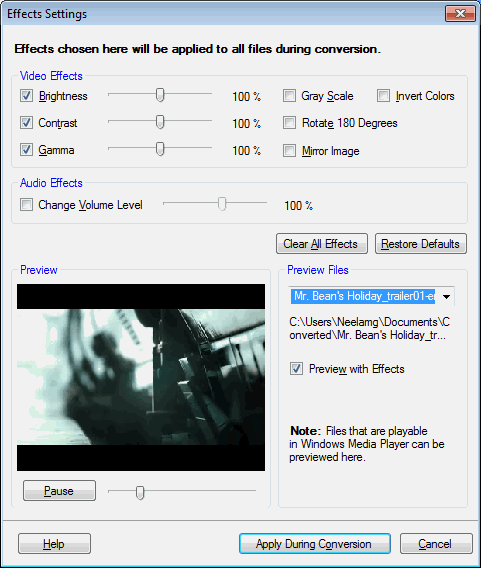
Video Effects
If your original videos are too dull or too bright you can improve it by adjusting the brightness with the help of the slider. Setting the contrast appropriately makes an image distinguishable from the background. Gamma value compensates for the differences in color display on different output devices so that images look the same when viewed on different monitors. High Gamma value results into brighter videos.
Enabling Gray Scale converts the colors in an image to shades of gray. Transform your colored videos to black and white. You can turn the image upside down with Rotate 180 Degrees option. The videos captured from a camera held upside-down can be corrected with this effect. Mirror Image effect produces the image that appears identical to the original but its right and left sides reversed. Invert Colors effect gives the video image a look similar to its negative.
Audio Effects
The volume of the converted media file can be adjusted with the Change Volume Level slider. Listen to the volume by playing the video in the preview window. You will need either a microphone or speakers to hear the audio.
Preview Your Media
Preview the video and the audio effects that you apply before the actual conversion. Select the file you want to preview from the Preview Files dropdown. Disabling the option Preview with Effects plays your original media file.
Note: The Preview with effects works only for files that play in the Windows Media Player. For instance, MOV files will not be previewed. However, effects will be applied to all files if they are present in the batch that is being converted, even if they cannot be previewed. When a file cannot be previewed, a sample image is displayed to show the effects selected.
|