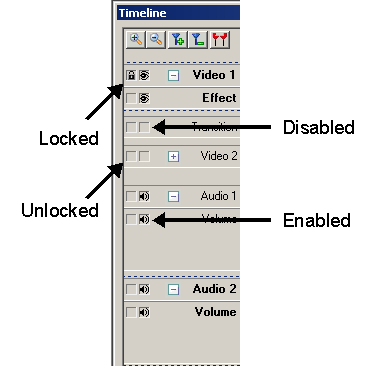
Understanding the Lock and Disable Options
The Lock and Disable option alter the way a track is displayed or selected. These options can be used to selectively edit and preview the Timeline. The Lock and Disable buttons form two separate columns across the length of the Timeline at the left edge of the Timeline. Each track contains both options. These options for a track can be toggled by clicking on the respective option for the track.
You can lock, unlock, disable or enable all tracks by using Edit >> Timeline Track Properties.
The Lock Option
The Lock Option forms the first column and the first option for every track in the Timeline. When a track is locked, an image of a door lock is displayed and any sources in a locked track appear disabled (grayed). Volume graphs in a volume track also appear grayed.
The Lock option is used to prevent accidental editing. Drag, Cut, Copy, Paste, Delete, Crop, Move and Resize (All editing operations) do not affect locked tracks. No sources can be moved in or out of a locked track. A locked track cannot be selected.
The Disable Option
The Disable option forms the second column and the second option for every track in the Timeline. Enabled video, effect and transition tracks are shown with the image of an eye and enabled audio and volume tracks are shown with the image of a speaker. No image is shown when a track is hidden.
Hidden tracks remain in the Timeline but are not shown in the preview. This option is very important when the Timeline is to be viewed without a particular track without deleting the contents (sources) in that track. For example to preview the Timeline without the effects, disable the effects track or to preview the Timeline without the audio, disable the audio track. One use of Disable is to turn off volume variations.
Learn more about Dragging Sources…
|