Adding Text and Image Labels to your Camera
You can add a label in the form of text, date and time, or image. Text and time labels help you to specify information about the location being surveyed by the camera and when a particular event has occurred. Adding images are useful when you want to add a company logo to a recording, photo or on the camera preview.
To add text and image to your recordings, click Add Camera >> Labels.
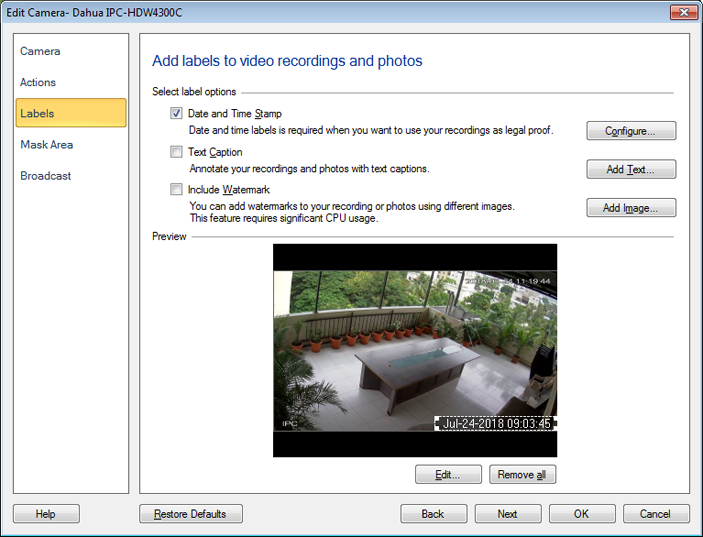
To edit a label, select the respective label and either click on the Edit button or right click on the selected label. You can delete the label by selecting it and pressing Del key from keyboard. If you want to remove all the labels, click on Remove all button. You can also move the selected label and position it at the required place. Move the selected label by using arrow keys from the keyboard.
Date and Time on Video Recordings and Photos
By default, Security Monitor Pro adds the current date and time (based on the PC's clock) to all video recordings and photos. By default, Date and Time stamp will be checked. When you click Configure, the following dialog will open:
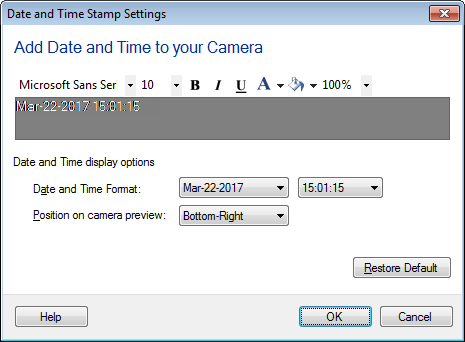
You can choose a font color for the Date and Time, which will help it stand out against various backgrounds. Set the background color and adjust the transparency level, so that the Date-Time stamp is properly visible. There are options for the Date (05-01-2012, 05-Nov-2012 etc.) and Time (12-hour or 24-hour clock) and Position. By default, the Date and Time will be displayed at the Bottom-Right position of the camera.
Text Labels
You may want to add some useful information on your video recordings and photos. You can add either the camera name or the camera location, using the Text Caption.
To add the Text Caption, click Add Camera >> Labels >> Add Text.
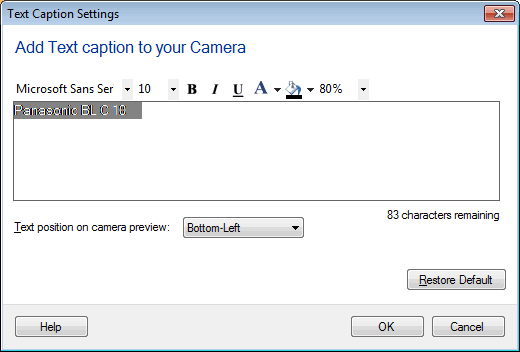
Use Text caption formatting toolbar to change the Font style, Font color, Background color and to adjust the transparency of the background color. Note: Below 60% transparency, motion will not be detected behind the Text Label. To position the text on camera preview, you can select the predefined positions.
Adding Watermark Image
Adding watermark image helps to identify the owner. You can brand the videos and photo files with the company logo. To add the Watermark Image, click on Add Camera >> Labels >> Add Image.
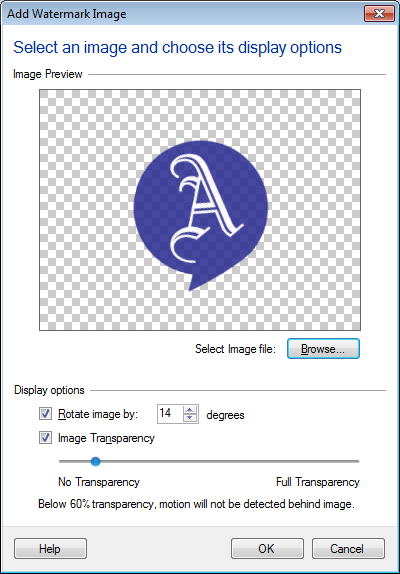
To select an image file, click on Browse button. The selected image will be shown in Preview area.
Display options:
- Rotate image by N degrees: To adjust the orientation of watermark image, select Rotate image by N degrees and specify the angle of rotation.
- Image Transparency: Image transparency helps you to adjust the visibility of underlying objects. You can adjust the Image Transparency by dragging the slider.
- No Transparency: Underlying image will be hidden.
- Full Transparency: Underlying image will be visible.
Note: Below 60% transparency, motion will not be detected behind the Watermark Label.
|