Trabalhando com clipes
Você pode re-organizar clipes no Storyboard, arrastando ou usando a área de transferência.
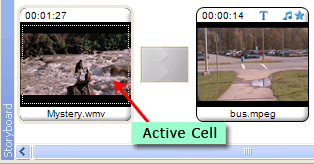
Célula de clipe selecionado/ativo
Sempre que você clique com o botão direito em um efeito, transição, título ou crédito ou música ficheiro e seleccione 'Adicionar a Storyboard', é adicionado a um clipe na célula selecionada (o que você clique em e que tem uma borda ao redor dele) ou a célula ativa, aquela última trabalhados. A célula ativa tem uma linha pontilhada ao redor dele (ver Figura 1).
 |
|
Figura 1: tracejado indicando um clipe ativo |
Se você adicionar uma imagem, um clip de vídeo ou uma transição para o Storyboard quando nenhuma célula é selecionado ou ativo, ele será adicionado à célula aberto mais próximo à borda esquerda. Se você adicionar um clip para o Storyboard e há uma célula ativa/selecionada, o clipe devem ser colocado na célula ativa/selecionada. Se a célula ativa/selecionada tem um clip sobre ele, o novo clipe substituirá o existente e o clipe mais velho e todos os clipes mais tarde são deslocados para a direita.
A seleção de clipes
Você pode selecionar um ou mais clipes no Storyboard para executar várias operações como Recortar, copiar, colar e remover, arraste e solte etc. Para selecionar um único clipe, basta clicar sobre ele. Vários clipes podem ser selecionados clicando em um espaço em branco vazio perto os clipes, e arrastar o cursor do mouse sobre vários clipes. Para selecionar vários clipes individualmente, mantenha pressionada a tecla Ctrl e clique sobre o os clipes que você deseja selecionar.
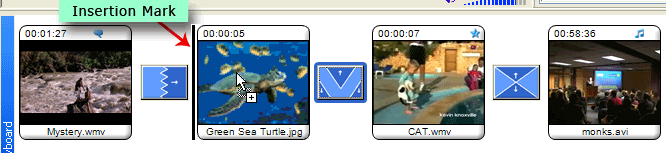
Você pode arrastar um clip (ou vários clipes selecionados), usando o cursor do mouse e soltá-lo para outra célula. Quando você arrasta um clip sobre uma célula, uma marca de inserção é exibida indicando que o clipe seria abandonado nele, uma vez que você solte o botão do mouse. Se a célula já tem um clip, o clipe seria movido para a próxima célula. Consulte a imagem abaixo indicada.
 |
|
Figura 1: Arrastando e soltando um clipe para outra célula |
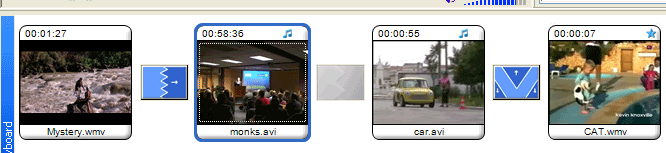
Um clipe pode ser arrastado e solto para qualquer célula para sua esquerda no Storyboard; até mesmo a um pouco antes de ele. Quando o novo clipe é descartado, o clipe existente desloca para a próxima célula no Storyboard. Consulte a Figura 2 e Figura 3 e tentar compreender como funcionam a arrastando e soltando. O clipe de 'monks.avi' na Figura 2 é caiu de sua posição para a segunda célula que contém o clipe de 'car.avi'. Como você pode ver na Figura 3, o clipe 'car.avi' (e o clipe depois dela) foi deslocada para a célula seguinte à sua direita e clipe de 'monks.avi' tem ocupado sua posição sobre a segunda célula.
 |
|
Figura 2: Arrumação de clipes |
Quando você solta um clipe para a direita de sua atual posição no Storyboard (exceto para a célula no seu direito de imediato que não é permitido), o clipe depois que ele leva sua posição original. O último clipe no Storyboard não pode ser descartado para a célula vazia ao lado. Não é possível deixar uma lacuna entre as células que contêm imagens ou clipes.
Split Video
Clips de vídeo no Storyboard pode ser dividido em pedaços usando o Split Video comando. Você pode escolher precisamente onde fazer a divisão. Esta operação é explicada no Capítulo Split vídeo o Guia do usuário.
Duração de imagem
A quantidade de tempo que uma imagem permanece na tela pode ser controlada, alterando o Duração de imagem.
|