Create Audio CD
Make audio CD from all the popular audio formats, including MP3, WMA, WAV, ASF, M4A, MP2, FLAC, OGG, RA, and more. Listen to your favorite music on any CD player, Car stereo or PC.
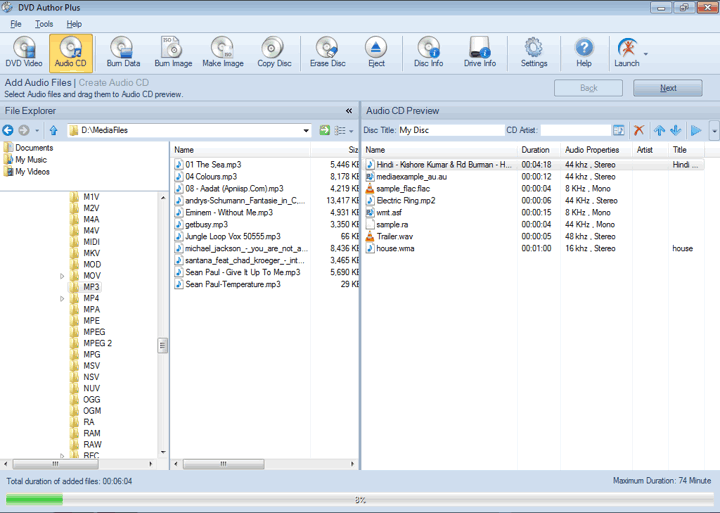
To create an audio CD, click File >> Audio CD.
Adding Files
To add files, select a folder containing audio files. Once a folder is selected, you can drag the files from File Explorer and drop them in the Audio CD Preview. At the bottom of the application window is the indicator that shows the total duration of the added files and Maximum duration allowed. To add multiple files, do one of the following:
- Hold the Ctrl key and click on the files to be added to Audio CD Preview. Right click and select Add to Audio CD Preview.
- Press and hold the mouse and drag it through the files which you want to include in your Audio CD.
Audio CD Preview Toolbar
Audio files will appear on disc in the same order as they appear in the Audio CD Preview.
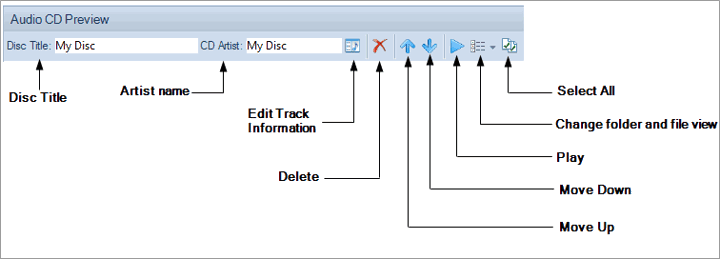
- Disc Title: Provide title to your disc, as you want to refer it.
- Artist name: You can provide your name as an artist. Artist name allows you to know, who has created a disc.
- Edit Track Information: Update the selected music file information like artist and track name.
- Delete files: Select the file(s) to be deleted and then click on the Delete button. Note: Deleting files from Audio CD Preview will not physically delete the original files from your computer.
- Move files up or down: Select the file(s) to be moved and then click on the Up / Down arrow button to move the selected files up or down the list.
- Play file: Select the file(s) to be played and then click on the Play button.
- Change View: Change the view of your files and folders. You can click on this icon to continuously toggle between the views.
- Select All: Press Ctrl + A to select all the files from Audio CD Preview.
Create Audio CD
When you are done, click on Next button. The following burning section will appear:

After adding the files, the next step is to burn them on a CD. All the disc drives connected to your PC are listed in the Write To combo box list. The speed at which the data is written on a CD can be selected from the Write Speed dropdown. Choosing a higher writing speed results in faster disc burn, but may result in a slightly degraded performance when reading the disc. Lower writing speed takes a little extra time but produces optimum results.
Click Create Audio CD to start the burning process. At the bottom of the application, the indicators show the status of burning process. When you click Create Audio CD, the Event log is updated at each stage of burning process.
|