Pan and Zoom Effect
The Pan and Zoom Effect, also known as the Ken Burns Effect, allows you to make a sweeping movement between different portions of images or videos. You can sweep across the length and breadth of your video frame, zoom into particular parts and create the illusion that a camera was moving across as the video plays.
Read the article about Adding Life To Images: The Pan and Zoom Effect.
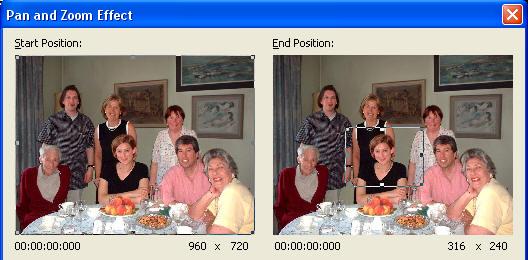
Start position: The Start position is the point on the video from which the panning and zooming will start.
The Start position can be specified by using the rectangle present inside the Start Position box. You can resize and reposition this rectangle to accurately specify the start position.
a) To resize the rectangle, move the mouse pointer over a side or corner handle of the rectangle. When the cursor changes into a double-headed arrow, drag the handle.
b) To reposition and move the whole rectangle, move the mouse pointer inside the rectangle. When the cursor changes into a four-headed arrow, drag the rectangle to the area of the picture that you want to want to be seen when the effect starts.
TIP: If you want to start the effect with the entire frame being displayed, double click inside this rectangle. The rectangle would expands to include the entire frame. You can also specify the size of this rectangle by entering the length and breadth values.
End Position: The End position is the point on the video where the panning and zooming will stop.
a) To resize the rectangle, move the mouse pointer to a side or corner handle of the rectangle. When the cursor changes into a double-headed arrow, drag the handle.
b) To reposition and move the whole rectangle, move the mouse pointer inside the rectangle. When the cursor changes into a four-headed arrow, drag the rectangle to the area of the picture that you want to be seen when the effect finishes.
TIP: If you want the pan and zoom effect to end with the entire end frame being displayed, double click inside the End Position rectangle. You can also specify the size of the End position rectangle by entering the length and breadth values.
Example:
Consider this family photo. You can use the Pan and Zoom effect to focus on the face of every member briefly, one after the other. To do so, first reposition and resize the Start Position rectangle to include the face of the person present on one end of the frame (the grandfather in this particular example). Now, reposition and resize the End Position rectangle so it includes the face of the person sitting at the other end (the grandmother).

When you play the video with this effect added to it, a panning movement will be carried out, from the start position rectangle to the end position rectangle. As the movement occurs, focus will also fall on the couple sitting in between as their faces lie in the path of the two rectangles.
If you want to highlight a particular portion of the picture, special focus can be placed on it by zooming in. To do so, double click on the Start Position box so that the rectangle includes the full screen. Now move the End Position rectangle to the place you want to zoom in to (at woman in black sitting in between). When you play the video, the scene starts with the entire family being shown. The view gradually shifts and narrows to focus on the woman.
By using various resizing and repositioning combinations, you can Pan and Zoom at the same time and also create other stunning effects. The speed of the panning and zooming will depend upon the effect duration. You can change this duration by resizing the Pan and Zoom Effect bar on the Timeline.
Options
Free form selection: Selecting this option will allow you to specify the Start and End positions without maintaining the aspect ratio of the project. Selecting this option is a good choice when you want more creative freedom in terms of focusing on a particular region accurately.
Set end position to be same as the start position: This option lets you make the size and End Position same as that of the Start Position. You can now reposition the two rectangles anywhere depending on how you want to pan. The advantage is that the resulting panning effect is without any zoom or change in relative image sizes.
Set start position to be the same as end position of the previous effect: This option is useful when you are using more than one Pan and Zoom effect on the Timeline.
For example, you can use a series of Pan and Zoom effects in succession to make a sweeping movement that would focus on points present in different parts of the frame. By selecting this option in a particular Pan and Zoom effect, the Start Position of that effect will coincide with the end position of the previous Pan and Zoom Effect on the Timeline. This will help to maintain continuity while carrying out complex sweeping movements.
This option is available for an effect only if there are one or more preceding Pan and Zoom Effects present on the Timeline.
|