|
Key Color Transition
There are four Key Color Transitions included in Video Edit Magic. All involve varying the colors in an image. All four of the Key Color Transitions are explained here.
Chroma Key Color
Chroma Key makes all areas of one video track, that are a particular color, transparent, letting the other video track "show through". It is used, for instance, to let actors perform in front of a "blue screen" and then add a separately-filmed background to the scene later.
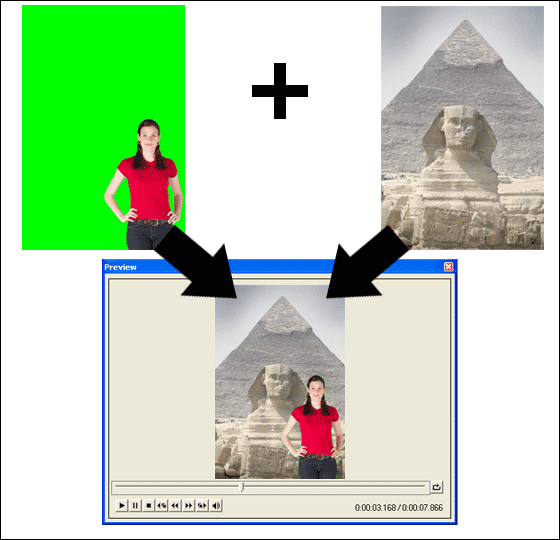
To use a chroma key color :
- In the Collections window, click the Transitions tab.
- Add Chroma Key Color by double-clicking on it or dragging and dropping it to the Timeline.
- Select the color to be made transparent. You may select a color using either of the following method:
- Selecting it from the primary colors.
- Specifying the Red, Green and Blue composition of the color
- Selecting a color from the color palette invoked by clicking on the Custom button or
- Selecting a color from the image. Simply drag the eyedropper icon to the preview area of the Chroma Key Color Transition window and release the mouse over the color that should be transparent.
- Optionally, select Invert Chroma Key. This will render all colors other than the selected color as transparent.
- If you want to apply to the effect to a wider range of colors, around the currently selected color, you can increase Similarity.
- To reverse the effect of the transition, select the Swap video tracks for this transition option.
The chroma key does not vary over time. Use this transition to overlay one image over the other.
Read the article: Using the Green Screen Techniques.
Non Red Key
Non Red Key makes blue and green colors of the overlay images / videos transparent. To use a Non Red Key Transition:
- In the Collections window, click the Video Transitions tab.
- Add Non Red Key by double-clicking on it or dragging and dropping it to the Timeline.
- Optionally, select the Similarity (in terms of percentage). Higher values of similarity makes wider range of non-red colors transparent.
- To reverse the effect of the transition, select the Swap video tracks for this transition option.
The non red key does not interpolate (vary) over time. This transition can also be used to compose overlays and to superimpose videos.
Luminance Key
Luminance Key is keying based on luminosity of an image. As the transition takes place, one image appears to "fade" into another, as if one image is transparent and another shows through it. To use a Luminance Key Transition:
- In the Collections window, click the Video Transitions tab.
- Add Luminance Key by double-clicking on it or dragging and dropping it to the Timeline.
- Select the Luminance. The range is from 0 to 100.
- You can also choose to Interpolate intensity or Keep Intensity Constant. If you select Interpolate, the strength of the Luminance Transition will vary over the duration of the Transition, making it seem that one video is "fading in" over the other. If you choose to Keep Intensity Constant, one video will appear to remain at a constant level of transparency, with the other one visible through it.
- Optionally, select Invert Operation for a reverse effect.
- To reverse the effect of the transition, select the Swap video tracks for this transition option.
Use Luminance key to achieve fade in and fade out effects. Luminance key is very effective when its operation is inverted. It's also very useful if you want to add a watermark to your movies.
Read the article: Watermark Your Videos.
Hue Key
Hue of an image is the color produced by visible light. The common color terms such as green, red or orange refer to hue. The key type alters hue over time. To use a hue key :
- In the Collections window, click the Video Transitions tab.
- Add Hue Key by double-clicking on it or dragging and dropping it to the Timeline.
- Select the hue value. The range is from 0 to 360.
- You can also choose to Interpolate intensity or Keep Intensity Constant. If you select Interpolate, the strength of the Hue Key Transition will vary over the duration of the Transition, making it seem that one video is "fading in" over the other. If you choose to Keep Intensity Constant, one video will appear to remain at a constant level of transparency, with the other one visible through it.
- Optionally, select “Invert Operation” for a reverse effect.
- To reverse the effect of the transition, select the Swap video tracks for this transition option.
Use hue key to achieve fade in and fade out effects with image burns. Hue key is also very effective when its operation is inverted.
Once the desired key type is selected and configured, click ‘Ok’ to apply the key type to the transition.
Swap video tracks for this transition
Normally, for Key Color Transitions, the picture from Video Track 2 appears in front of Video Track 1 (and the transition makes Video 1 visible). If you Swap Video Tracks For This Transition, Video 1 will be in front of Video 2.
|