Watermark
Your Videos
You may need to add
identity and ownership information to your video, ensure
that viewers know the source. Digital Watermarking allows you to embed text or graphics, for example, a
logo, in digital media such as video or images. It
is an excellent way to stamp a personalized
identification mark such as your company name, date of
creation etc. on the visual material.
The process of
Watermarking becomes very easy with Video Edit
Magic. You can add Watermarks to your videos
in an unobtrusive yet effective way using Transitions
and Effects. You can create a unique watermark to
brand your creations.
The following steps tell you
how to do it:
- Select the
Video/Image to be used as a Watermark
You can use
any image as a watermark for your video. Just make
sure the image file
format is supported by Video Edit Magic. The Text/Title Effect is another option that lets you can add a
name as identification. In this article we shall
use the DeskShare logo as a watermark.
- Add the Video you want to Watermark
Open the
video or image you want to watermark in Video Edit Magic. Add it
to Video Track 1 in the Timeline.
Here we have added the video: caves_explore.wmv
- Add the Video / Image file to be used as a Watermark
Open the file
to be used for Watermarking and add it to the Timeline. The file containing the DeskShare
logo (logo.JPG) is added to the Video 2. You can
also use a video file for a watermark instead of an
image. Make sure that the duration of this file as
well as the effect and transition added to the Timeline
is same as that of the video to be watermarked (if you
want the watermark for the entire duration of the
video). You can do this by stretching the file,
effect and transition in the Timeline.
- Add Luminance Transition
Select the Luminance transition from the ones listed under Video
Transitions. Configure the Settings to adjust
the level of Luminance. Select the Keep
Intensity Constant option and set the intensity
percentage in the range of 60 to 80. Any values
lower will make the watermark seem opaque and resemble
an image placed on top of the video file. Any
values higher will make the watermark seem so
transparent that it would hardly be seen.
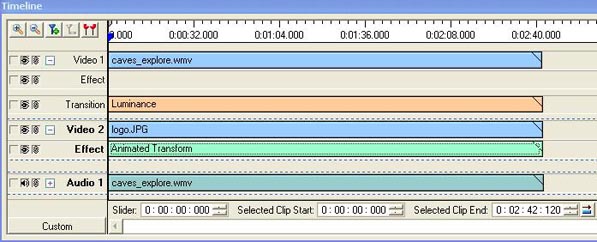
- Alter Watermark Image Using Animated Transform Effect
If you wish
to use a smaller, less noticeable watermark in the
corner of your video, which is how most people watermark
their videos, you can use the Animated Transform Effect to resize and move the
watermark to the desired size and location.
After you
have resized and moved the watermark image to the
desired location, select ' Set end position to be the
same as start position'. The 'Number of
rotations' is 2 by default but change it to 0.
As you can see in the image given below, we resized the
logo and moved it to the top right side of the display
window.

Adjusting the
settings for the
Animated Transform Effect and
Luminance Transition will usually resolve
problems in the appearance of either the watermark or
video file. Once you feel comfortable with
watermarking using Video Edit Magic, embedding
watermarks in your videos will take only moments.