Using the Green Screen
Technique
‘The world is but a
canvas to the
imagination.’
This quote reflects the
fact that with a little
leap of imagination, you
can go to places that
never were, do things
that were never done and
bring your dreams closer
to reality.
Unfortunately,
imagination without the
right tool is limited
only to remain its
creator's fantasy.
Whether it is the right
brush while you paint,
or the right software
while editing videos,
you need the right tools
to do the right things.
The Chroma Key Color
Transition in
Video Edit Magic is
one such tool.
Also known as the Green
or Blue Screen
technique, it can help
you create truly
startling illusions.
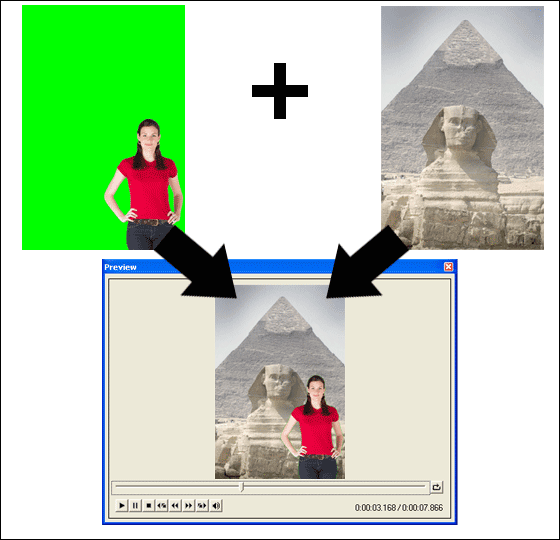
You may never have
visited the Taj Mahal or
the Pyramids of Egypt
but with this technique
you can at least make it
seem that you actually
did.
Basically, in this
technique a subject is
shot in front of a green
or blue screen.
(Any solid color will
work, but these two are
the most common.)
Video Edit Magic then
removes this color from
the video clip, and
fills in the empty space
with the picture from
another video clip, or a
still picture. A
good example is the
weather reports shown on
television. The
video is created by
combining a video with
an animation. The
video shows weatherman
standing in front of a
green screen while the
animation displays maps
and graphics. The
green background of the
video is replaced by the
animation.
Things you need
The beauty of this
technique is its
simplicity. To
achieve this effect, all
you need are 2 videos or
images, a green/blue
screen and Video Edit
Magic.
Green/ Blue Screen
You can purchase a ready
made screen. No
matter which color you
are using, Green or
Blue, care has to be
taken that the screen is
uniform in color and
shade. You can
also make an inexpensive
screen by using a table
cloth or even a wall
that is evenly painted
and lit. Spend
some time to remove
dirt, discolorations,
folds and wrinkles.
Uneven colors in the
screen will result in a
video with floating
objects and blotches.
One cannot conclusively
say that the blue color
is better than the green
color or vice versa.
The choice mainly
depends upon the subject
(the person or object in
the foreground video).
It is important that the
subject contains as
little of the screen
color as possible
whether in their
clothing or as part of
an object. For
example, if the person
has blue eyes, choose a
green screen.
Another handy hint while
deciding the color is
analyzing the color
scheme of the video
which will be inserted
as the background.
For example, if the
background you are going
to insert contains
images of the sea, then
use a blue screen.
If the background
contains an image of a
park or trees, use a
green screen. This
way you can hide and
minimize the impact of
the edges that appear
due to non uniform or
unevenly lit screens.
Proper lighting
Once you have decided on
the color of the screen,
the next step is to
shoot the subject
standing in front of it.
If you are aiming for
perfection, make sure
that the subject has a
well defined outline.
There should not be
small parts of the
clothing or even hair
hanging loose as you
want a sharp separation
from the background.
The camera's focus
should be on the subject
(and not the
background), to prevent
a blurry effect.
Be sure no one's
clothing matches the
background color—if
you're using a blue
screen, and a man is
wearing a blue tie, in
the final movie it will
seem that he has a hole
right through his chest!
The lighting of your
background is very
important. It
should be evenly lit.
If it is too brightly
lit, then some light
will reflect off the
background producing
visible circles in the
final combined movie.
Also, make sure that the
subject is not too close
to the background
screen. This is to
avoid shadows, which
disturb the uniform
color of the background.
Since getting the
lighting absolutely
right is challenging,
the easy thing to do is
to shoot outdoors.
The Sun is a great light
source, as the
distribution is even.
Just make sure that no
shadows fall on the
screen.
Applying Chroma Key
Color Transition
Now, that you have
created your video with
the green/blue
background, the next
step is to use the
Chroma Key Color
Transition in Video Edit
Magic. This
transition replaces the
green/blue background
with another video or
image.
Superimposing two
videos:
- Add the
video /
image with
the blue
background
to the Video 2
track on the
Timeline.
- Add the
video /
image you
want to
superimpose
to the Video 1
track on the
Timeline.
- Position
the Seek Slider so that
it coincides
with the
point on the
two videos
from which
you want the
superimposition
to begin.
- Select
the Transitions tab in the Collections window.
Right-click
on the Chroma
Key Color icon and
select Add
Transition
to Timeline.
Configuring Chroma Key
Color Properties:
To configure the
Transition properties,
right-click on the
Chroma Key Color
Transition in the
Transition track of the
Timeline and select
Transition Settings.
You will see the
following window:
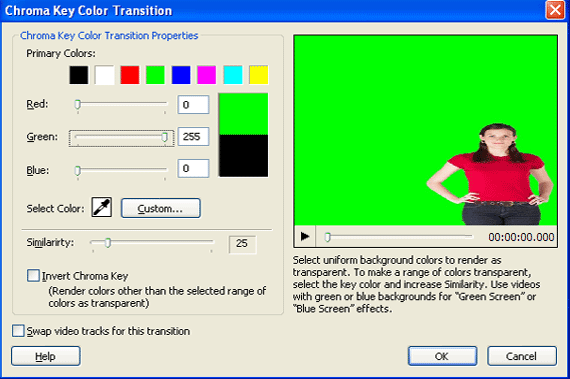
-
Select
the color
that you
want to make
transparent.
Drag the eye
dropper icon
from Select Color and move
it over the
color you
want to
select.
Alternately,
you can also
select a
primary
color to be
made
transparent
from the
Primary
Color array,
or specify
the RGB
values by
entering
them in the
Red, Green
and Blue
boxes.
- It is
quite
impossible
to get an
perfectly
uniform
green or
blue color
as the
background
of your
videos.
It will
typically
contain
varying
shades of
green or
blue.
To make more
shades of
the same
color as
transparent,
you can
increase the Similarity.
Keep
increasing
the Similarity gradually
until you
get a
well-defined
superimposed
image.
- Click on OK.
A final word
The Chroma Key Color
Transition can help you
bridge the gap between
reality and illusion.
Not only can you
superimpose videos of a
person against a
backdrop, you can also
use it to remove or add
objects inside a video.
The overall illusions
and possibilities
offered are so stunning
and so vast, that once
you are enchanted, you
just won’t be able to
get over your romance
with the Green Screen.
This technique gives you
the ability to do the
impossible, and most
importantly do it with
grace. Like with
all creative projects,
the overall look of the
video will largely
depend upon your
creativity and attention
to detail.
Before starting, do a
bit of planning and
identify what you are
trying to achieve.
Then let the world be
your canvas. After
all, imagination takes
cues from the real
world.