Useful Video Editing Techniques
Before digital video editing exploded on to the
scene, video editing was as technical as it was creative. Now, with easy to use
desktop based editing tools like
Video Edit Magic,
creativity has truly come to the forefront.
If imagination is your
forte, you can do
amazing things while
editing your digital
videos. This
article will familiarize you with some
useful editing techniques.
Sharpen your editing skills
with these
techniques and start getting more out of your videos.
If you are starting an editing project from scratch,
it is a good idea to follow
the basic principles for
planning and shooting your
videos. Capture as much footage as you can, so you have plenty to work with during the editing process.
Then delete unnecessary
footage; put scenes in
order; add special
effects; and add narration, titles and transitions between video clips. All of this
is easy with Video Edit Magic’s drag and drop, cut,
copy and paste operations.
You can start editing, by dragging your videos from the Media
File tab in
the Collections
window to the video track on the Timeline.
Cutting unnecessary footage using cropping
You can remove footage
with the
Cut operation. You use it to delete the beginning and the ending of
a clip, retaining only the middle portion.
There are two types of cropping operations available
in Video Edit Magic.
a. Cropping the entire content of the Timeline.
b. Cropping selected sources only
To learn more about cropping, you may
refer to our article on editing techniques to remove unnecessary footage .
Applying Transitions
A video
Transition defines how a movie moves from
one clip to another. It is never a good idea to move between two video clips
suddenly. A transition gives
the viewer a sense of continuity.
There are
many types of transitions. The Cross Fade moves
smoothly between two video clips,
without jarring the
watcher. The picture given below
shows you how a Cross
Fade transition works.

Adding Effects
An
effect produces results that
cannot be achieved by
normal techniques.
While special effects
are traditionally very
expensive, and the
special domain of
Hollywood technicians,
digital video editing
with software like Video
Edit Magic makes it
simple to leave your
audience stunned.
One effect is the
Brightness/Contrast effect. This can be used
to correct images that
appear too bright, dark
or dull. The picture
given here shows you a
video before and after
applying the effect.

Removing noise and adding music or narration
To make your videos stand out, you can add narration
in your own voice. This can be a great addition to your home videos that
contain a lot of scratchy,
distracting audio.
You can delete the
original audio
completely, or replace
some parts with your
narration or a music track.
To delete unnecessary audio:
- Select the audio track, which you want to edit.
- Move the Selection Sliders to the portion you want to delete.
- On the Edit menu, click on Cut.
To add narration to a video, first connect a
microphone to your PC.
- Position the Seek
Slider on the Timeline, where you want to add your narration.
- On the Tools menu, click on Narration.
- Click on the Start button and start speaking into the Microphone.
- Click on Stop when you are done. Save the audio file you recorded.
Creating title slides
Title slides are great
for beginnings, endings
and credits. To create title slides that blend with the general
theme of the video,
combine the Take Snap feature with the Add Text
feature.
To take a snap from the video:
- Position the Seek Slider on Timeline the to the frame which you want to use as
a title slide. It is a good idea to select a frame with a uniform background,
so your annotation or text stands out. The image in the Preview window would be
captured as the snap.
- From the Tools menu, click on Take Snap.
- In the Take Snap properties window, specify the Output
Format, Dimensions of the image and the
image Quality. Click on OK to save
the image to
the path
specified
under Save To.
To
add text to the snap you
have taken:
- Add the
image file
you had
created
using the Take
Snap tool, to the Timeline.
- Click on the Effects tab
in the Collections window.
- Right-click on the Text/Title effect icon
and click on Add Effect
to Timeline.
- Once the
effect has
been added
to the Timeline,
right-click
on it and
select Effect
Settings option to
launch the
properties
window. You
can insert
text using
different
fonts,
backgrounds,
styles and
positions to
get the
title effect
you want.
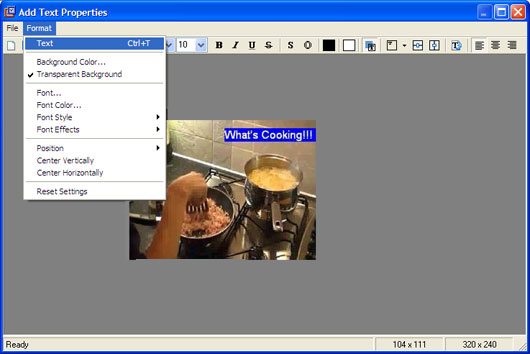
- In the File menu of
the Add Text Propertieswindow,
click on Save and Close.
- Move the snap and the Text/Title effect to the beginning of the Timeline or towards
the end to display your credits.
These editing techniques can change the look and feel of your videos. Experiment with the techniques described in this
article using different effects and transitions.
Once you have edited your videos, you can consider
the various distribution options for sharing those special moments with family and friends.