Useful Audio Effects
While creating
videos, the visuals
receive more
importance than the
audio. But
audio is vital for
videos and plays a
very important role
in enhancing the
viewing experience.
Acknowledging its
importance,
Video Edit Magic provides you with
Audio tracks on
which you can place
audio files.
Audio Tracks:
Video Edit Magic has two
audio tracks.
Whenever you add a video
clip to the Timeline,
its audio is
automatically added to
one of these Audio
Tracks. You can
also add audio files
containing your favorite
song, a background
score, or a voice-over
narration.
Types of Audio you can
add to the audio tracks:
Narration means using
a recorded
voice to
explain
what's on
the video.
Audio
narration
can help you
share your
experience,
in your own
words.
To use the
Audio
Narration tool in
Video Edit
Magic, you
must have a
microphone
connected to
your PC.
To add Audio
Narration:
- Add the
video clip
to the
Timeline.
- If you don’t
want to
retain the
original
audio track,
click on the
audio track
and hit the
delete
button.
- Click on Narration from under
the Tools menu.
Click on Options to change
the Audio
Device and
the Audio
Compressor
used for
recording.
- Position the
Seek Slider
on the
Timeline
where you
want to
start
narrating
and click Record.
- Click on Stop when you
are done.
A audio file
will be
created on
the audio
track with
your
recorded
narration.
Background
Music can be used
to create a
mood.
Audio files
in popular
file formats
like MP3 and
WMA can be
placed on
either of
the two
audio
tracks.
You can
insert your
favorite
songs
as background
music to
your videos.
Volume Graph:
A volume graph is under
both audio tracks.
The volume graphs remain
hidden by default.
To view them, click the
small white plus sign
beside every audio
track. Click it
again to hide the volume
graph.
 Volume Track
highlighting Volume
Variations
Volume Track
highlighting Volume
Variations
Volume graphs let us
adjust audio visually.
A volume graph is
similar to a rubber band
which can be stretched
to change the volume
levels. When you
click on this rubber
band, a little dot
appears. You can
then click and drag this
dot up and down to
adjust the volume level.
If you want to get rid
of a dot, simply right
click on it.
You can also move the
entire graph together to
specify a new volume
level, while retaining
the variations you have
specified. To move
the entire graph, press
the CTRL key and click
on any dot. Now,
while keeping the key
pressed, drag the dot
upwards or downwards.
The entire graph will
move with the dot.
You can change the
volume at any point to
between 0 and 400% of
the original volume.
Types of Audio Effects
you can create:
Mixing:
You can choose to have both
narration and background
music played
simultaneously. To
do so, place the
background music on the
second audio track.
Now, mix the narration
and music by using the
volume graphs. For
instance, you can lower
the volume of the music
when the narration
begins.
Audio Cross Fades: A cross fade is a
smooth transition
between two audio files.
One audio source
gradually becomes
quieter while the other
becomes louder.
During a scene change,
you can insert a new
music piece without it
sounding out of place or
breaking the flow of the
story. Applying an
audio cross fade is very
easy with the volume
graphs. To create
audio cross-fade effect,
you must have audio
sources on both audio
tracks, positioned so
that they overlap.
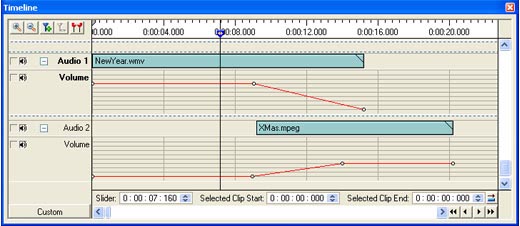
Timeline
showing the
Audio
Cross-fade
effect
The screen-shots show a
sample audio cross-fade
between Audio 1 and
Audio 2 for a period of
approximately 2 seconds.
The audio in Audio 1
will decrease in volume
(from 100% to 0%) until
it reaches silence.
At the same time, the
audio in Audio 2 will
increase in volume until
it reaches 100%.
This is an audio
cross-fade.
Doppler Effect:
Let’s
start with an example.
A fire engine siren will
ring at a higher than
its stationary pitch,
slide down as it passes,
and continue to lower
than its stationary
pitch as it recedes from
an observer. If
the vehicle approached
the observer directly
the pitch would remain
constant. But to
avoid hitting the
observer the vehicle has
to take a radial route.
This radial movement
causes Doppler Effect,
which is basically a
variation in the pitch.
Doppler effect is a
change in frequency and
wavelength of a sound
wave, resulting either
due to motion of the
source or the observer.
Audio Points that can be
seen in the screenshot
above need to be
adjusted to control the
sound waves and get a
Doppler effect.
Audio points when
arranged in a crest and
trough pattern, what you
get is a Doppler Effect.
Sounds and silences have
their role to play in
video productions.
Orchestrate them in your
creations using Video
Edit Magic. Blend
audio with your videos
and you will see that
your videos reach new
heights.