Applying
Transitions Correctly
You edit video by arranging clips on the timeline. A
transition is the change from one video clip to
another.
Video Edit Magic provides over 100
transition
effects (often just called "Transitions") that let
you control the look, speed, and feel of the change from
one clip to another. Some transition effects also allow
you to combine two clips into a single picture, for
instance
Picture-in-Picture and
Green Screen transitions.
Video Edit Magic's Timeline
has two Video tracks. There must be video clips on
both tracks to use transitions. A transition connects
two scenes. It is
always performed on a pair of video clips. If you just
have one video clip, you can split it and place a part
on each of the video tracks. Refer to the article Editing Techniques to remove unnecessary footage for help on splitting a video clip.
Video Edit Magic provides Transitions
to help you give style and flow to your videos. The
number of ways in which you can use Transitions is limited
only by your creativity. Once you are familiar
with the basic process, allow your imagination
to take over and create some truly personal and unique videos.
Transitions are present under
the Transitions tab of the Collections window.
Some of the frequently used
transitions are:
- Wipe: In a Wipe
transition, one
video track is progressively replaced by the
other. The new track may be in the form of
a growing shape (like a diamond or arrowhead),
or just "sweep" over the other track. Use a
Wipe when you want the viewer to be very aware

- JPEG Image Wipe: In this case, a
JPEG image file is used as an intermediate stage
between the two video clips. The first clip
dissolves to the image, and then the image
dissolves to the second video clip. You can
choose any JPEG image for the intermediate
image—it does not have to be in the Media
Collection.

- Matrix Wipe: In a Matrix Wipe,
the new image replaces the old one in a moving
pattern. For instance, with a Clockwise Matrix
Wipe, the new image fills in more and more of
the screen in a spiral pattern (in a clockwise
direction). There are over 30 possible Matrix
Wipes, including diagonal, horizontal, vertical,
and various spiral patters.

- Pixelate: A Pixelate transform
blurs the first clip gradually, then clears the
blur to reveal the second clip. You can
set a "pixel size" which controls how blurry the
intermediate stage is. (The larger the
number, the bigger the "blocks" on the screen.)

- Chroma Key Color: You can remove a color from
an image to reveal another image behind it using
Chroma Key Color. Any color you wish to exclude can be
made transparent and used to superimpose videos.
This transition is described in detail in our
article on the Using The Green Screen Technique.

- Luminance: The luminance
transition gradually "fades" the first video
clip out and fades in the second. The colors in
the first clip are gradually lightened while the
colors in the second start very light and
gradually darken.

- Picture
Arrange: Two videos can be played side by
side using this transition. The screen gets shared by
two videos which can be arranged diagonally, vertically,
horizontally etc. You can specify any Background Color
as a backdrop to suit the videos you positioned
adjacently. Corner of one video can be overlapped by
other; the video tracks can be swapped and videos
rearranged by just opening the Transition Properties
dialog for Picture Arrange Transition. The procedure to
open this dialog for any transition is similar and is
explained later in this article.

- Although the Transition
names are self explanatory, you still might want to see
a preview of what a particular Transition can do. To
watch a small preview, simply right-click on the
Transition icon and select Preview from the menu.
The small preview window under the word Collections will
display the Transition.
- Let us try adding the Special Wipe Transition between
two video clips. This transition wipes off the
first video clip and gradually introduces the second
clip through a variety of selectable shapes like Stars,
Rectangles, Key holes etc.
To add a transition:
- Position the seek slider on the Timeline where
you would like the Transition to start.
Generally,
this would be near the point where the two videos
start overlapping.
- Select the Transitions tab in the Collections window.
- Right-click on the Special Wipe transition icon
and then select Add
to Timeline.
- For a transition to work correctly, you must
place it between the 2 overlapping sections of
the video clips present in the 2 video tracks.
In this figure, the end portion of the video
in ‘Video 1’ overlaps with the
beginning portion of the video in ‘Video
2’. The Special Wipe Transition is
on the Transition track between the overlapping
parts of both videos.
Cross Fade is a commonly-used transition
for scene changes. It isn't as flashy or
noticeable as a transition like a Matrix Wipe.
Before applying a cross-fade, you must have a
video clip in video track 1 and another in video
track 2. Apply the transition between the
overlapping sections of the two videos.
To apply a cross-fade from video 1 to video 2:
- Move the Seek Slider to the point on the
Timeline where the two videos begin to overlap.
- Select the Transitions tab of
the Collections.
- Double-click on the Cross
Fade transition icon to launch the transition properties window.
- Click on OK .
The Transition is added to the
location of the Seek Slider. You can resize the transition, to increase/decrease the
duration
Configuring Transition
Settings
All Transitions have settings that you can configure to
meet your creative vision. When you add a
Transition to the Timeline, its settings window opens
and you can choose them at this time. To change the
settings later, just double-click the Transition on the
Timeline. For the Special Wipe
Transition, you would see a window like the one shown
below:
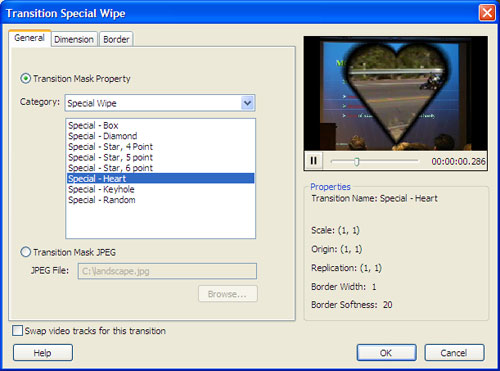
You can
modify all the settings shown above. For instance, if you wanted
to use a different type of Wipe Transition, like the
heart wipe, you would just select it from the
Category dropdown.
If you want to transition from video track 2 to video
track 1 (instead of the usual 1-to-2 order), select the
option Swap video tracks for this transition.
The Preview screen in this window can be used to see how
the transition looks with different settings.
Duration of a Transition
You can change the duration of a Transition (the length
of time it takes) by simply clicking the mouse on the
right edge of the rectangle and dragging it.
Choosing the best Transition
Now that you know how
to apply a Transition, you can be creative. Choosing
a transition is matter of personal style, though you
might want to consider a few basic tips:
- Try not
to use too many different Transitions through
out the video. Remember, Transitions should
never be the main attraction. Using too many
transitions can make the video appear garish
and tasteless.
- For corporate videos, it is better to avoid
using jazzy transitions which might take the
focus away from the main topic. Leave the
wipes aside for another day, and try a fast
cross fade or random dissolve. The idea is
to blend different sections of the video
gracefully without distracting the audience.
- The Chroma Key Color Transition can put
characters and objects from a video clip in a
completely different setting. This effect is a
Hollywood favorite.
- For home videos, try experimenting with
different Transitions and settings to create a
memorable movie.
You will be surprised by
the sheer number of ways a Transition can be adapted to
change the look of your video. Transitions like
Picture-in-Picture will convince your viewers that you are a pro. So much to choose from and
so easy to use- Video
Edit Magic.