Adding Life To Images:
The Pan and Zoom Effect
There are times when you
feel that certain
elements of your video
need to be focused on.
You might want to
include the precious
moments captured in your
collection of
photographs. The
creative genius in you
wants motion that your
camera didn't capture.
You can do all this and
much more with the
Pan and Zoom effect (also known
famously as the Ken
Burns effect) in
Video Edit Magic.
That priceless
expression on a person's
face can be highlighted
by zooming in. You
can creatively pan
across one end of the
photo to the other and
produce movement in the
otherwise lifeless
image. Moving back
and forth to focus on
details within the same
image becomes a reality
when you work with this
effect.
Some of things you can
do with the Pan and Zoom
effect are as follows:
- Breathe Life
to Images:
That amazing
collection of photos
you have could
enrich your video.
Simply use this
effect to pan from
one side of the
picture to another
(or from the top to
the bottom),
creating an illusion
of movement.
- Avoid Jarring
the Viewer:
While it is nice to
supplement video
with images that add
to the overall
story, a sudden jump
from video that has
motion to still
photos can startle
your viewers.
Pan across snaps to
create an illusion
of continuous
movement.
- Highlight an
Element:
You can simply zoom
in on the person or
section of the video
that you want to
emphasize. The
point of view
gradually moves
toward to the
target, providing
the viewer a closer
look at a crucial
component of your
visual composition.
- Enhancing
Video Motion: If the camera
panned during
filming, but you
would like a more
sweeping movement in
your final video,
use Pan and Zoom to
sweep across the
width of the video
frame while the
camera is also
panning. This
can produce a truly
dramatic feeling of
fast movement.
This technique lets
you focus on
important elements
in the image, while
simultaneously
showing the entire
setting.
Most video editing
software provide pan and
zoom effects. To
apply this effect while
working with Video Edit
Magic:
- In the File menu, click Open
File.
- Browse to the
image file you want
to work with and
click the Open button.
- The file is
added to the Collections window.
- Double-click the
name of the file to
add it to the
selected video track
in Timeline or drag
and drop to a video
track.
- Select the Effect track to
which you wish to
add this effect and
move the Selection
Slider to the time
when you want the
effect to start.
- Select the Pan and Zoom from the Effects tab in
the Collections window.
Double-click to add
it to the selected Effect track.
- Select the
options you desire
for the effect and
click OK.
- To preview the
video after this
effect is added,
click the Play button on the Preview window.
Now let us take a look
at how to actually work
with this effect and the
marvelous difference it
makes to your videos.
Panning:
Consider this family
photo. You can use
the Pan and Zoom effect
to focus on the face of
every member briefly,
one after the other.
To do so, go to
Effect Settings.
First reposition and
resize the
Start
Position rectangle to include
the face of the person
present on one end of
the frame (the
grandfather in this
particular example).
Now, reposition and
resize the
End
Position rectangle so it includes
the face of the person
sitting at the other end
(the grandmother).
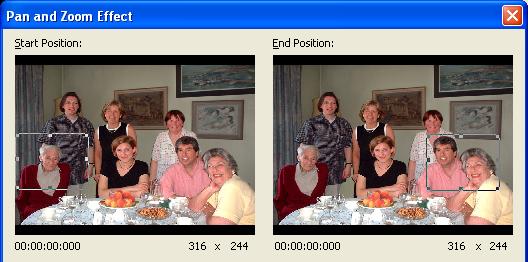
When you play the video
with this effect added
to it, a panning
movement will be carried
out, from the start
position rectangle to
the end position
rectangle. As the
movement occurs, the
focus will shift from
the grandfather to the
grandmother and will
include the couple
sitting in between as
their faces lie in the
path of the two
rectangles.
You also have the option
to Set end position
to be the same as start
position. This
makes the size and
location of the End
Position rectangle same as
that of the Start
Position.
Since the start and end
positions are the same,
this produces a pure
zoom effect. The
video is zoomed to a
particular point, and
the zoom remains the
same through the
duration of the effect.
Set start position
to be the same as
end position of the
previous effect:
This option is available
when you are using more
than one Pan and Zoom
effect on the Timeline.
When you select this
option, the Start
Position of that effect
will be same as the end
position of the previous
Pan and Zoom effect on
the Timeline. This
helps maintain
continuity while
carrying out complex
sweeping movements where
you use multiple panning
and zooming effects.
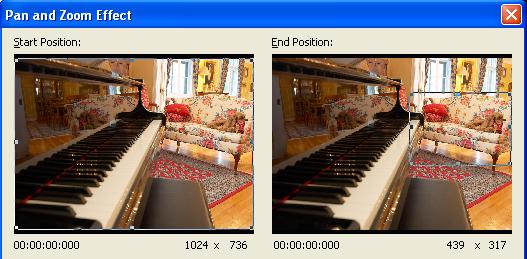
Consider the example
given below. In the
first effect, the camera
pans from the piano and
zooms in to finally
focus on the sofa.
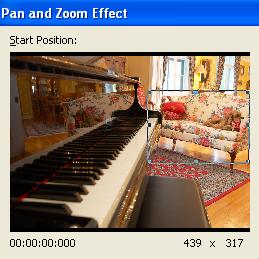
Now, if you want to
maintain continuity in
the panning movement,
add another Pan and Zoom
effect and select the
option
Set start
position to be the same
as end position of the
previous effect.
The
Start Position rectangle
automatically positions
itself in the same place
that the last Pan and
Zoom effect ended (in
this case, the sofa) as
you can see in the
screenshot below.
You can now pan away
from the couch and to
zoom on another spot in
the room, for instance
back to the piano.
Zooming:
If you want to
highlight a
particular portion
of your video, you
can emphasize it by
zooming in. To
do so, double-click
on the
Start
Position box so
that the rectangle
includes the full
screen. Now
move the
End Position rectangle to the
place you want to
zoom in to (the
building at the end
of the path).
When you play the
video, the scene
starts with the lake
and woods being
shown. The
view gradually
shifts and narrows
to focus on the
building. Now
you can actually see
the faade of the
building as well as
the car parked in
front of it which
was unnoticeable
earlier. Talk
about directing the
viewer's attention!
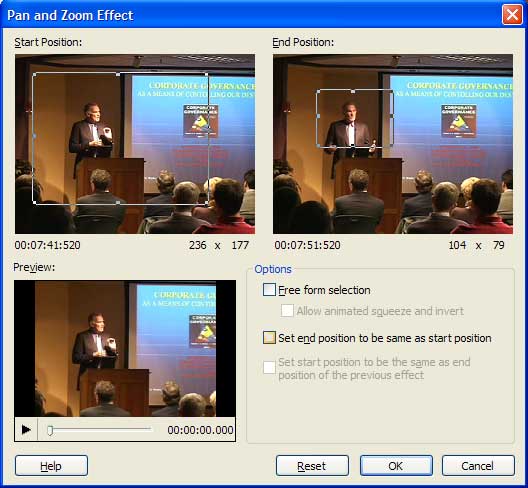
Another interesting
option is
Free form
selection.
This option allows you
to specify the
Start and
End positions
without maintaining the
aspect ratio.
Selecting this option
gives you more creative
freedom in terms of
focusing and zooming on
a particular region
accurately. Care
must be taken while
working with this
setting since it leads
to exaggerated widening
or lengthening of images
and the edited video may
appear distorted.
Final Word:
By using various
resizing and
repositioning
combinations, you can
Pan and Zoom at the same
time and also create
other stunning effects.
The speed of panning and
zooming will depend upon
the effect duration.
You can change this
duration by resizing the
Pan and Zoom effect
bar on the
Timeline.