Applying Effects Correctly
Special effects have always been
about making the impossible
possible. They help us see the
unseen, visualize the
invisible, hide the overpowering,
and focus on the little object no
one ever bothered about.
Whether it’s about making a
Hollywood blockbuster, or simply
making a home video more exciting to
watch, the need for special effects
borders on the essential to an
absolute must.
By using visual effects in your
videos, you send messages that would
be impossible otherwise, and enhance
the overall look and feel.
Video Edit
Magic comes with several special
effects that can be applied with a
only a few clicks mouse clicks.
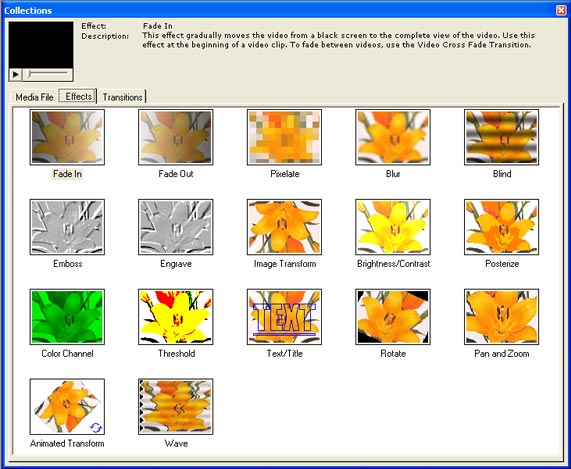
These effects are listed under the
Effects tab in the
Collections window.
Some of the often used effects are:
- Fade In:
Starting from a black
screen, the video clip
gradually brightens into
view. This effect can
be used to show that time
has passed, or that the
characters are in a new
location.
- Fade Out:Fade
Out is the opposite of Fade
In—the picture gradually
darkens to black.
Combining Fade Out with Fade
In can provide a graceful
way to change scenes, while
maintaining visual
continuity.
- Rotate: The
Rotate Effect is most often
used when the original video
is not oriented correctly.
For instance, Rotate can be
used to fix clips shot with
a tilted video camera.
You can rotate any amount
between 1 and 360 degrees.
- Brightness/Contrast:You can correct lighting
problems in your videos by
adjusting the brightness,
contrast and gamma using
this effect.
- Brightness: How light or
dark an image appears. If a
video clip was filmed with
inadequate light it may
appear dark—this effect can
be used to correct the
problem.
- Contrast: Contrast is the difference
between the light and dark
areas of an image. The
higher the contrast, the
more that people and things
stand out from the
background. Properly
adjusting contrast makes the
video look sharp and clear.
- Gamma: Gamma defines the color
balance of an image, by adjusting
the relative brightness of different
colors. The correct gamma
setting gives you a more "real"
looking picture.
- Animated Transform: The Animated
Transform causes the video
clip to spin, change size,
and change position.
You can use only one, two,
or all three of those
transformations, so this
effect could be used to
simply have the effect "zoom
out" or "iris in" (get
bigger, or get smaller), or
spin in place.
- Emboss: Embossed
video appears metallic and
"raised", as if embossed on
metal. This can give a
surreal feel to your movie,
and can be especially
effective when used on text.
Range of effects are present under
the
Effects tab of the software's
Collections window.
Basically, there are two ways to use
Effects. You can either add
effects (like Color Balance or Image
Transform) through out the length of
a clip to improve the quality of the
video, or you can apply effects
(like Blur, Fade, or Pixelate) to a
certain portion of the video to make
a point.
Applying an Effect
To decide on the Effect to apply,
first select the Effect icon in the
Collections window. Then
click on the Play control under the
Instant Preview screen.
To help you make a more informed
choice, a short description of the
selected Effect is also displayed in
the Collections Window.
To add the
Rotate effect to the
Timeline:
- Position
the Seek
Slider on the Timeline where you
would like the Effect to be
added.
- Select
the Effects tab in the Collections window.
- Right-click on the Rotate effect icon and select Add to Timeline.
The Effect will be added to
the Effects track on the
point where the Seek
Slider is positioned. (The
selected tracks will be
labeled in boldface on the
Timeline.)
- In the Timeline the effect would be
represented by a horizontal
bar. The length of the
bar represents the time
period during which the
Effect is applied. By
default, this value is 10
seconds. To change the
duration, resize the
horizontal bar by using the
resizing handle present on
the top right corner of the
bar.

Configuring Effect Properties
The settings of the Rotate Effect
can be configured according to your
requirements.
To access the Properties window,
right-click on the Effect in the Timeline and selectEffect Settings.
Zoom:
Setting Zoom here controls the image
size while it is rotated.
Zooming
in (larger picture)
can make the image appear closer.
Zooming out makes the image smaller
and thus apparently more distant.
Use the four arrow controls to set
the zoom level, or select a level
directly from the drop-down list.
Do not confuse Zoom (a setting for
the Rotate Effect) with Pan and Zoom
(a different Effect).
Position: Use the
Position setting to control where
the rotated video appears in the
movie frame. This is
especially powerful in combination
with Zoom (making the image smaller
leaves more space in the frame to
position it). You can position
the video using the four arrows.
A drop-down list lets you pick how
far each mouse-click will move the
image.
Rotation: The Rotation
transform can be used to change the
orientation of the video. You
can specify any angle from 0 to 360.
Background Color: You
can specify the background color for
the video by clicking on the
Choose button. This
will launch a color palette, from
which you can select a background
color.
Reset:
The Reset button restores all the
settings to the default values.
There are similar settings
selections for many Effects.
Some Effects have no configurable
settings, and no Effect window can
be opened for them.
Applications of the Rotate Effect in
your videos
Now that you know how to apply and
configure the Rotation Transform
Effect, let us discuss some possible
applications for it in your videos.
- Removing letter boxes:
Letter boxes are the black bands you
see when you convert video from one
aspect ratio to another, for
instance converting wide screen
movies (16:9) to the aspect ratio of
normal TV sets and computer monitors
(4:3). To remove the black
bands while preserving the aspect
ratio, you can use the Zoom transform. For more on aspect
ratios, see Video Dimension, Aspect Ratio and
DVD.
- Zooming into text:
Another application is Zooming in on
a region of interest. For
example, in a vacation video you can
zoom in on road signs, milestones,
and billboards to show the route you
took and the places you visited.
In a wedding video, you can zoom in
on invitation to show the audience
the date, time and venue of the
event. When editing the video
of your kid’s ball game, you can
zoom in on the scoreboard between
plays to give the video a sense of
drama.
- Correcting orientation:
You can use the Position transform
in combination with the Rotation
transform to correct or improve the
orientation of the video. You
can easily rotate your videos by 90
degrees or 180 degrees, but it is
especially useful for correcting
videos that are slightly
off-vertical.
- Cropping unwanted portions: You can also use the position
transform to crop unwanted portions
of your video. For example,
you might have a vacation video
showing your family standing in
front of a historical building, but
unfortunately tourists wander into
the frames. By zooming and
repositioning, you can remove the
side of the image. Then you
can use the Background Color feature to
insert color in place of the bands
that might crop up due to
repositioning.
Conclusion
Do not try to fit a square peg in a
round hole. It is important
that you add a special effect only
when they are of value to your
project. Do not forget that
the special effect is used for
making a point, and should blend in
with the main theme of the video.
The best videos are the ones, where
special effects are used so subtly
that people don’t even know that an
illusion was created. If you
are trying to create a fun video,
then you can include all the fades,
blurs, and pixelates that you want!