Trabajo con clips
Puede reorganizamos los clips en el guión gráfico, ya sea arrastrando o utilizando el Portapapeles.
Celda de Clip seleccionado/activo
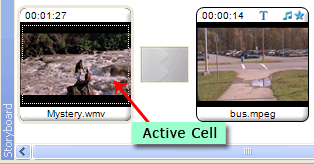
Cada vez que pulse el botón derecho sobre un efecto y seleccione 'Agregar a guión gráfico' archivo de música, título o crédito o transición, se añade a un clip en la celda seleccionada (una pulsar y que tiene un borde oscuro alrededor) o la celda activa, el uno que trabajó por última vez en. La celda activa tiene una línea de puntos alrededor de ella (véase la figura 1).
 |
|
Figura 1: línea de puntos que indica un Clip activo |
Si agrega una imagen, el clip de vídeo o la transición al guión gráfico cuando ninguna celda está seleccionada o activa, se agregará a la celda abierta más cercana al borde izquierdo. Si se agrega un clip al guión gráfico y existe una celda activa/seleccionada, el clip se colocaría en la celda activa/seleccionada. Si la celda activa/seleccionada tiene un clip, el clip nuevo reemplaza al existente y el clip anterior y todos los clips posteriores se desplazan a la derecha.
Selección de Clips
Puede seleccionar uno o más clips en el guión gráfico para realizar varias operaciones como cortar, copiar, pegar, eliminar, arrastrar y soltar, etc.. Para seleccionar un único clip, simplemente haga clic en él. Pueden seleccionar varios clips haciendo clic en un espacio en blanco vacío cerca de los clips y arrastrar el cursor del ratón sobre varios clips. Para seleccionar varios clips individualmente, mantenga pulsada la tecla Ctrl y haga clic en el los clips que desee seleccionar.
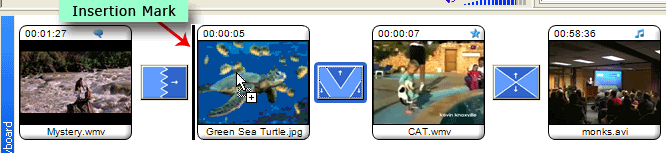
Puede arrastrar un clip (o varios clips seleccionados), utilizando el cursor del ratón y colóquelo en otra celda. Cuando se arrastra un clip sobre una celda, una marca de inserción aparece indicando que el clip se sería cayó sobre él una vez que se suelta el ratón. Si la celda tiene ya un clip, el clip se trasladó a la siguiente celda. Consulte la imagen a continuación.
 |
|
Figura 1: Arrastrar y colocar un Clip a otra celda |
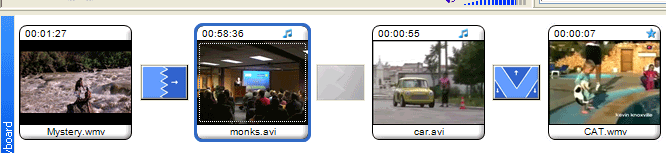
Un clip puede arrastrar y colocar para cualquier celda hacia la izquierda en el guión gráfico; incluso el uno anterior a ésta. Cuando se coloca el nuevo clip, el clip existente se desplaza a la siguiente celda en el guión gráfico. Consulte la figura 2 y figura 3 y tratar de entender cómo funcionan arrastrando y soltando. El clip de 'monks.avi' en la figura 2 se cayó de su posición a la segunda celda que contiene el clip de 'car.avi'. Como puede ver en la figura 3, el clip 'car.avi' (y el clip después) se ha desplazado a la celda siguiente a su derecha y clip de 'monks.avi' ha ocupado su posición en la segunda celda.
 |
|
Figura 2: Recolocación de Clips |
Cuando coloque un clip a la derecha de su posición actual en el guión gráfico (excepto para la celda a su derecha inmediata que no está permitida), el clip después toma su posición original. No se puede quitar el último clip en el guión gráfico a la celda vacía a su lado. No es posible dejar un espacio entre las celdas que contienen clips o imágenes.
Video de Split
Clips de vídeo en el guión gráfico pueden dividirse en piezas con la Video de Split comando. Puede elegir precisamente dónde realizar la División. Esta operación se explica en el Capítulo de Video de Split de la Guía del usuario.
Duración de la imagen
La cantidad de tiempo que una imagen permanece en la pantalla se puede controlar modificando la Duración de la imagen.
|