Panorámica y Zoom efectos
El Pan y el efecto Zoom, también conocido como el efecto de Ken Burns, le permite realizar un movimiento de barrido a través de imágenes o clips de vídeo. Puede barrer a lo largo y ancho de su fotograma de vídeo, acercar partes concretas y crear la ilusión de que una cámara mueve la imagen.
Posición inicial: La posición de inicio es donde se centrará la cámara virtual cuando el efecto comienza.
La posición de inicio puede especificarse mediante el rectángulo en el Posición de iniciocuadro. Cambiar el tamaño y la posición de este rectángulo para especificar la posición de inicio.
una) para cambiar el tamaño del rectángulo, mueva el puntero del ratón sobre un lado o esquina manejador del rectángulo. Cuando el cursor cambie a una flecha de dos puntas, arrastre el control.
b) para colocar y mover el rectángulo todo, mueva el puntero dentro del rectángulo. Cuando el cursor cambie a una flecha de cuatro puntas, arrastre el rectángulo a la zona de la imagen que desea desea verse cuando se inicia el efecto.
SUGERENCIA: Si desea iniciar el efecto con todo el fotograma que se muestra, haga doble clic dentro de este rectángulo. El rectángulo se expande para incluir todo el fotograma. También puede especificar el tamaño del rectángulo introduciendo los valores de longitud y anchura.
Posición final: La posición final es el punto en el clip de vídeo donde se detendrá la panorámica y zoom.
una) para cambiar el tamaño del rectángulo, mueva el puntero del mouse a un lado o esquina manejador del rectángulo. Cuando el cursor cambie a una flecha de dos puntas, arrastre el control.
b) para colocar y mover el rectángulo todo, mueva el puntero dentro del rectángulo. Cuando el cursor cambia a una flecha de cuatro puntas, arrastre el rectángulo a la zona de la imagen que desea ser visto cuando termina el efecto.
SUGERENCIA: Si desea que el efecto panorámica y zoom para acabar con toda la imagen de vídeo que se muestra, haga doble clic dentro del rectángulo de la posición final. También puede especificar el tamaño del rectángulo de posición final introduciendo los valores de longitud y anchura.
Ejemplo:
Considere esta foto de familia. Puede utilizar el efecto panorámica y Zoom para centrarse en la cara de todos los miembros brevemente, uno tras otro. Para ello, primero colocar y cambiar el tamaño de la Posición de inicio rectángulo para incluir el rostro de la persona de que se presente en un extremo de la trama (el abuelo en este ejemplo en particular). Ahora, colocar y cambiar el tamaño de la Posición final rectángulo de forma que incluya el rostro de la persona sentada en el otro extremo (la abuela).
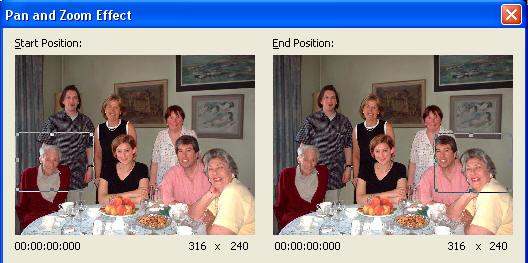
Cuando se reproduce la foto con este efecto añadido, parecerá como si está realizando el seguimiento de una cámara se centró en la foto del rectángulo de la posición de inicio para el rectángulo de posición final. El enfoque pasará sobre la pareja sentada entre así.
Si desea destacar una parte determinada de la imagen, lo destacan por hacer zoom sobre ella. Haga doble clic en el Posición de inicio cuadro para que el rectángulo incluye la pantalla completa. Ahora mueva el Posición final rectángulo para el área que desee ampliar. (En la ilustración, la mujer de negro en la mesa.) Cuando se reproduce el vídeo, la escena comienza con toda la familia se va a mostrar. Gradualmente la imagen cambia y acorta para centrarse en la mujer.

Mediante el uso de diversos tamaño y reposicionamiento combinaciones, puede Pan y Zoom al mismo tiempo y también crear otros efectos sorprendentes. La velocidad de la panorámica y zoom dependen de la duración del efecto.
Opciones
Selección de forma libre: Esta opción le permitirá especificar las posiciones inicial y final sin mantener la proporción de aspecto del proyecto. Mediante esta opción puede resultar en una imagen distorsionada (estirada o contraída).
Establecer la posición final que al igual que la posición de inicio: Si selecciona esta opción, se establecen los rectángulos de posición inicial y final para ser idénticos en tamaño y posición. A continuación, puede arrastrar los dos rectángulos libremente para crear efectos de Pan con ningún Zoom (no cambiar la ampliación de la imagen). |