Create photos from your videos with Video Edit Magic
There are times when you wish that a moment could be
captured forever. A special glance, a secret smile or some other important
event is a rare occurrence and is hard to capture using a photo camera. Videos
on the other hand are laced with such moments, which unfortunately are too
brief and disappear within instants. With the Take Snap feature in
Video Edit Magic,
you can extract these special moments by finding them in the video clip, capturing the freeze frame, and saving the
image.

Taking snaps from your video clips is a useful
feature. Instead of sending
entire videos containing
extra footage to
friends, family and colleagues, you can email just the important frames. You can
connect your digital camcorder to your PC and import the captured video
into
Video Edit Magic.
You can then use the Take Snap feature to extract the
best moments and save them as unforgettable pictures.
The Take Snap feature can also be used to produce title slides
for your videos. Just take a snap, move it to the
beginning of the Timeline
(or to the beginning of a section), add
titles and impress your friends with your professional looking movie.
Capturing your video
The first step is to capture the video of the
subject. You can then proceed to take snaps from that video. Once you have
connected your digital camcorder to your PC, follow these steps to capture a
video:
- Start Video Edit Magic.
- Click on Capture from under the Tools menu.
- In the Capture window, click on the Options button.
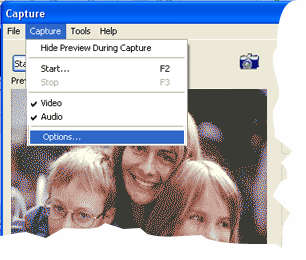
- The Options window opens. In the General tab, under Save
Options, specify the location where you would like to save the captured video.
- Select the Output tab. Please make sure that the Output
options are set to AVI. This is because AVI files can be edited easily. Click on OK to go back to the Capture window.
- To start capturing, click on the Start Capture button.
- When you believe that you have enough video to work with, click on Stop
Capture.
You are now ready to Take Snaps from
your video.
Taking Snaps from your video
- Start Video Edit Magic.
- Import the video file you just captured from your hard drive by clicking on Open
File from under the File menu.
You can
import any
video and
Take Snaps
from it.
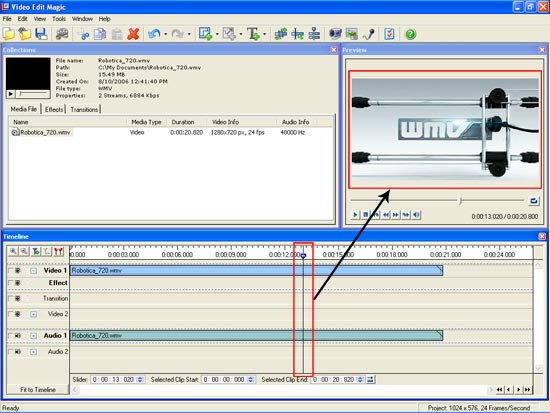
- Add your video to the Timeline. To add it to the
Timeline, select it first in
the Collections window, right click
on it, and select Add
to Timeline. Alternately, you can simply drag it from the Collections window to one
of the Video tracks
in the Timeline.
- Position the Seek
Slider at the frame you want to capture on the Timeline.
Use the Preview window to position the slider accurately on the frame you wish to capture. The
image in the Preview window would be captured as an image file.
- Open the Tools menu and click on Take
Snap. You can also use the shortcut CTRL
+ F2.
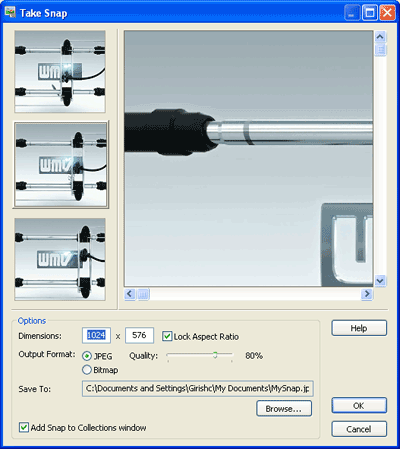
- In the
Take Snap window, specify the type of Output Format,
dimensions of the image and the
image Quality.
Select which
of the three
available
frames you
want to
capture,
then click
on OK to
save the
image to the
path
specified
under Save To.
Creating Title Slides from your snaps
You can add titles and
textual comments to your
snaps to create striking title slides. To create a title slide:
- Add the image file you had created using the Take Snap Feature, to the
Timeline.
- Click on the Add Text button
on the toolbar to launch the Add
Text properties window. You can add text using
different fonts, backgrounds, styles and positions to get the title effect you
want.

- In the File menu of the Add Text properties window, click on Save and Close.
- Move the snap and the Text effect to the beginning of the Timeline
or towards the beginning of a particular section of your video.
- Delete the
Video Color
Clip that
was created
along with
the Text
Effect, and
arrange the
clips so
that the
Text Effect
and the
image file
occupy the
same range
of the
Timeline
(start and
end at the
same time).
You can vary
the times
for dramatic
effect.
- Preview the video and resize the
text or the image file to get the
desired effect.
Having more fun with the Take Snap feature
Video Editing is all about your imagination. You can
shape your videos in countless ways with the different tools that Video Edit
Magic provides. The Take snap feature is no exception. Use Take Snap to break the monotony of continuous playback. Insert captured frames at appropriate moments with text and annotation, and
enjoy the praise of
everyone you've
impressed.
You can also make use of the Take Snap feature to
create video slide shows using Video Edit Magic.
A video slide shows can contain your extracted frames, so you can
show only the significant events. You can also decorate your slides
with text; apply transitions and effects to create truly spectacular visuals. The size of your slide show would be just a fraction of the original video,
letting
you distribute it to
a wider audience.