Pan et effet de Zoom
Le Pan et l'effet de Zoom, aussi connu sous l'effet de Ken Burns, vous permet de faire un mouvement de balayage à travers des images ou des clips vidéo. Vous pouvez balaient la longueur et la largeur de votre image vidéo, zoom en particuliers parties et créer l'illusion qu'une caméra se déplace l'image.
Position de départ: La position de départ est où la caméra virtuelle sera axée lorsque l'effet commence.
La position de départ peut être spécifiée à l'aide du rectangle dans le Position de départboîte. Redimensionner et repositionner ce rectangle pour spécifier la position de départ.
un) pour redimensionner le rectangle, déplacez le pointeur de la souris sur une côté ou handle du rectangle d'angle. Lorsque le curseur se transforme en une flèche bicéphale, faites glisser la poignée.
b) pour repositionner et déplacer le rectangle ensemble, déplacez le pointeur de la souris à l'intérieur du rectangle. Lorsque le curseur se transforme en une flèche à quatre têtes, faites glisser le rectangle de la zone de l'image que vous souhaitez veut être considérée quand commence à l'effet.
ASTUCE: Si vous souhaitez démarrer l'effet avec l'image entière affichée, double cliquez à l'intérieur de ce rectangle. Le rectangle serait s'élargit l'image entière. Vous pouvez également spécifier la taille de ce rectangle en entrant les valeurs de longueur et la largeur.
Position de fin: La position de fin est le point sur le clip vidéo où le panoramique et zoom seront arrêtera.
un) pour redimensionner le rectangle, déplacez le pointeur de la souris d'une côté ou handle du rectangle d'angle. Lorsque le curseur se transforme en une flèche bicéphale, faites glisser la poignée.
b) pour repositionner et déplacer le rectangle ensemble, déplacez le pointeur de la souris à l'intérieur du rectangle. Lorsque les changements de curseur dans une flèche à quatre têtes, faites glisser le rectangle de la zone de l'image que vous souhaitez être vu lorsque l'effet se termine.
ASTUCE: Si vous souhaitez que l'effet panoramique et de zoom pour mettre fin à toute l'image vidéo affichée, double-cliquez sur l'intérieur du rectangle de la Position de fin. Vous pouvez également spécifier la taille du rectangle position fin en entrant les valeurs de longueur et la largeur.
Exemple:
Considérer cette photo de famille. Vous pouvez utiliser l'effet panoramique et de Zoom de mettre l'accent sur la face de chaque membre brièvement, l'un après l'autre. Pour ce faire, tout d'abord repositionner et redimensionner le Position de départ Rectangle pour inclure le visage de la personne présente sur une extrémité de l'image (le grand-père dans cet exemple). Maintenant, repositionner et redimensionner le Position de fin Rectangle donc il inclut le visage de la personne assise à l'autre extrémité (la grand-mère).
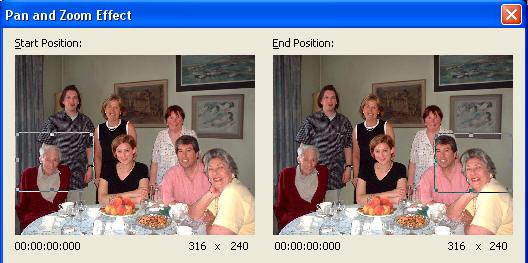
Lorsque vous jouez la photo avec cet effet ajouté à celui-ci, il se penchera comme si une caméra axée sur la photo est suivi du rectangle de position de départ pour le rectangle de position de fin. L'accent passera sur le couple assis entre ainsi.
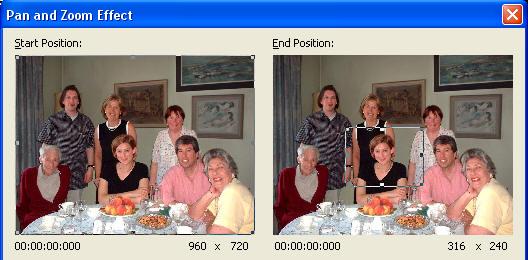
Si vous souhaitez mettre en évidence une portion particulière de l'image, le souligner par zoom avant sur elle. Cliquez deux fois sur le Position de départ case afin que le rectangle comprend le plein écran. Maintenant, déplacez le Position de fin rectangle de la zone que vous voulez agrandir. (Dans l'illustration, la femme en noir à la table.) Lorsque vous jouez à la vidéo, la scène commence avec toute la famille est démontrée. L'image a progressivement les déplacements et se rétrécit de se concentrer sur la femme.
En utilisant divers de redimensionnement et de repositionnement des combinaisons, vous pouvez panoramique et Zoom en même temps et également créer d'autres effets étonnantes. La vitesse de panoramique et de zoom dépendent de la durée de l'effet.
Les options
Sélection de forme libre: Cette option vous permettra de spécifier les positions de début et de fin sans conserver les proportions du projet. L'utilisation de cette option peut entraîner une image déformée de (étirée ou pressée).
Définissez la position de fin d'être identique à la position de départ: Si vous sélectionnez cette option, les rectangles de position de début et de fin sont définies est identique à la taille et la position. Vous pouvez ensuite glisser les deux rectangles librement pour créer des effets, Pan avec aucun Zoom (le grossissement de l'image ne change pas). |